SSH/SFTP Connection to a Compute Session
Backend.AI supports SSH/SFTP connection to the created compute sessions (containers). In this section, we will learn how to do it.
Note
From 24.03 SSH/SFTP connection feature is available in both Web browser and WebUI Desktop application. When the version is 23.09 or lower version, you need to use WebUI Desktop app. Desktop app can be downloaded a panel from the Summary page. Using this panel, the compatible version will be downloaded automatically.

You can also download the app from https://github.com/lablup/backend.ai-webui/releases. Make sure to download the compatible version of the Web-UI in this case. You can check the Web-UI version by clicking on the "About Backend.AI" sub-menu located in the preference menu on the upper-right side of the GUI.
For Linux / Mac
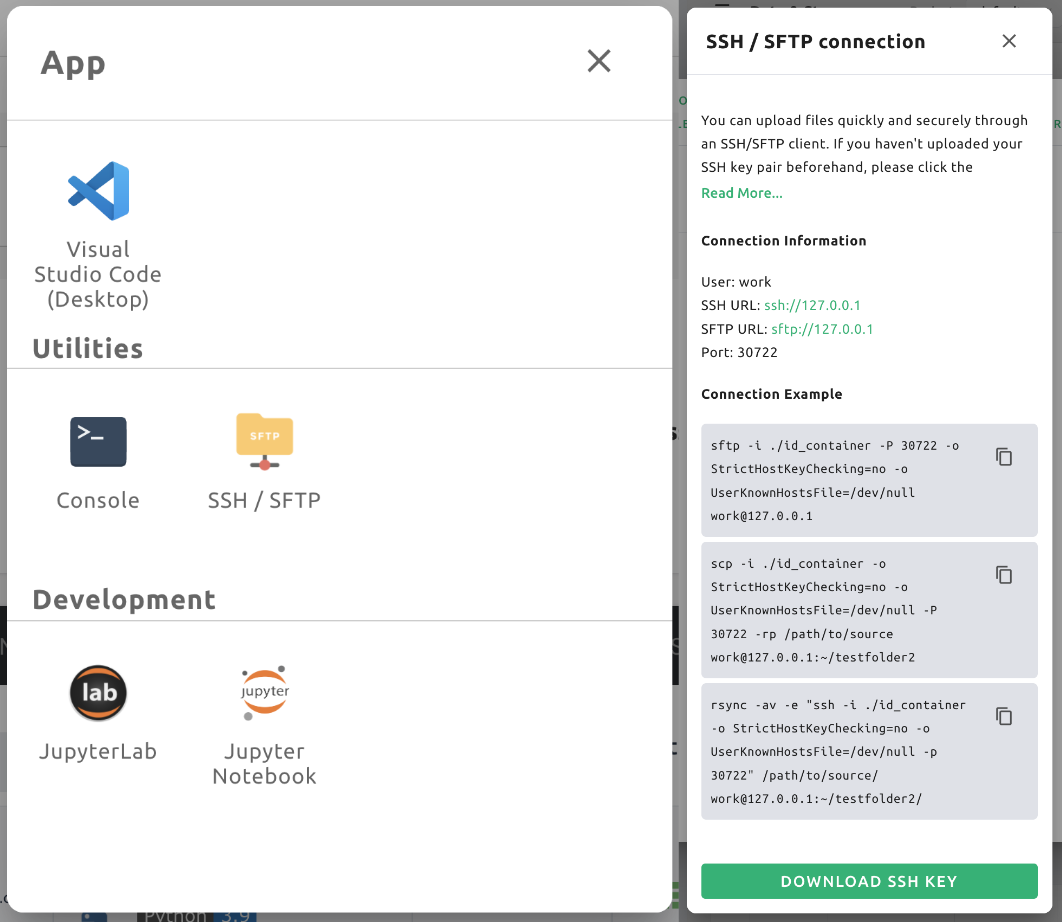
First, create a compute session, then click the app icon (first button) in Control, followed by SSH / SFTP icon. Then, a daemon that allows SSH/SFTP access from inside the container will be initiated, and the Web-UI app interacts with the daemon through a local proxy service.
Warning
You cannot establish a SSH/SFTP connection to the session until you click the SSH/SFTP icon. When you close the Web-UI app and launch it again, the connection between the local proxy and the Web-UI app is initialized, so the SSH/SFTP icon must be clicked again.
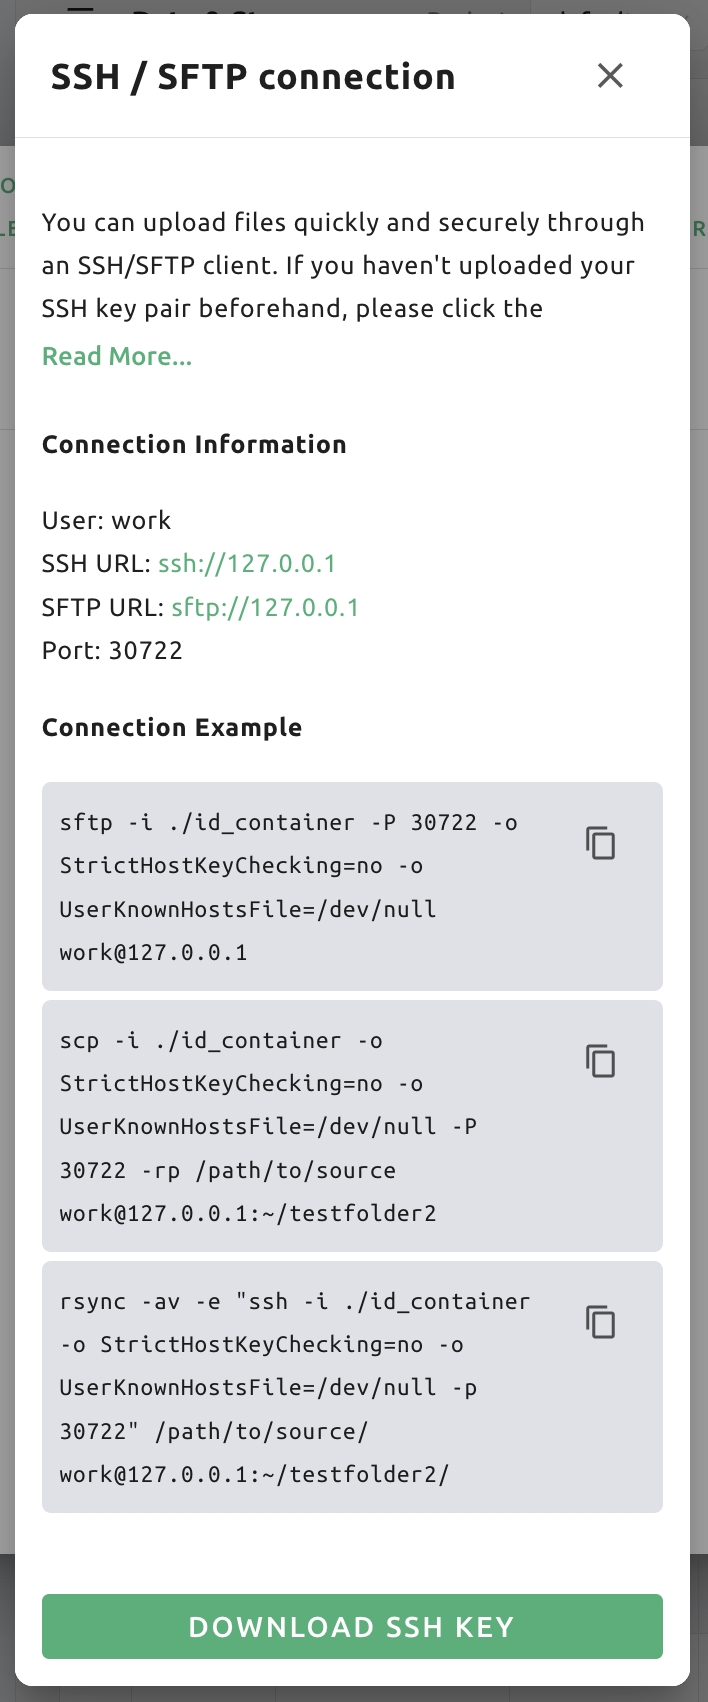
Next, a dialog containing SSH/SFTP connection information will be pop up.
Remember the address (especially the assigned port) written in the SFTP URL and
click the download link to save the id_container file on the local machine.
This file is an automatically generated SSH private key. Instead of using the
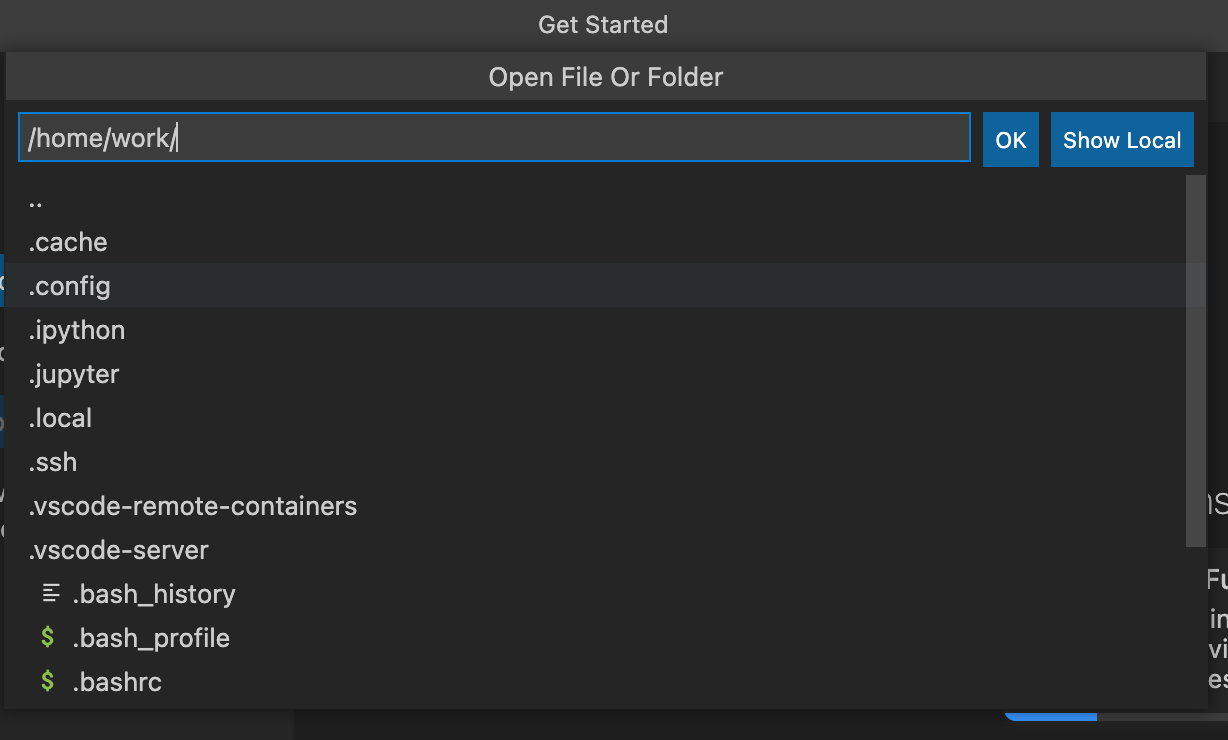
link, you can also download the id_container file located under
/home/work/ with your web terminal or Jupyter Notebook. The auto-generated
SSH key may change when new session is created. In that case, it must be
downloaded again.
To SSH connect to the compute session with the downloaded SSH private key, you
run the following command in the shell environment. You should write the
path to the downloaded id_container file after -i option and the
assigned port number after -p option. The user inside the compute session is
usually set to work, but if your session uses other account, the work
part in work@127.0.0.1 should be changed to the actual session account. If
you run the command correctly, you can see that SSH connection is made to the
compute session and you are welcomed by the container's shell environment.
$ ssh
>     -i ~/.ssh/id_container -P 30722 \
>     -o StrictHostKeyChecking=no \
>     -o UserKnownHostsFile=/dev/null \
>     work@127.0.0.1
Warning: Permanently added '[127.0.0.1]:30722' (RSA) to the list of known hosts.
f310e8dbce83:~$
Connecting by SFTP would almost be the same. After running the SFTP client and
setting public key-based connection method, simply specify id_container
as the SSH private key. Each FTP client may adopt different way, so refer to
each FTP client manual for details.
Note
The SSH/SFTP connection port number is randomly assigned each time when a session is created. If you want to use a specific SSH/SFTP port number, you can input the port number in the "Preferred SSH Port" field in the user settings menu. To avoid possible collisions with other services within the compute session, it is recommended to specify a port number between 10000-65000. However, if SSH/SFTP connections are made by two or more compute sessions at the same time, the second SSH/SFTP connection cannot use the designated port (since the first SSH/SFTP connection has already taken it), so a random port number will be assigned.
Note
If you want to use your own SSH keypair instead of id_container, create a
user-type folder named .ssh. If you create authorized_keys file in
that folder and append it with the contents of your SSH public key, you can
connect by SSH/SFTP through your own SSH private key without having to
download the id_container after creating a compute session.
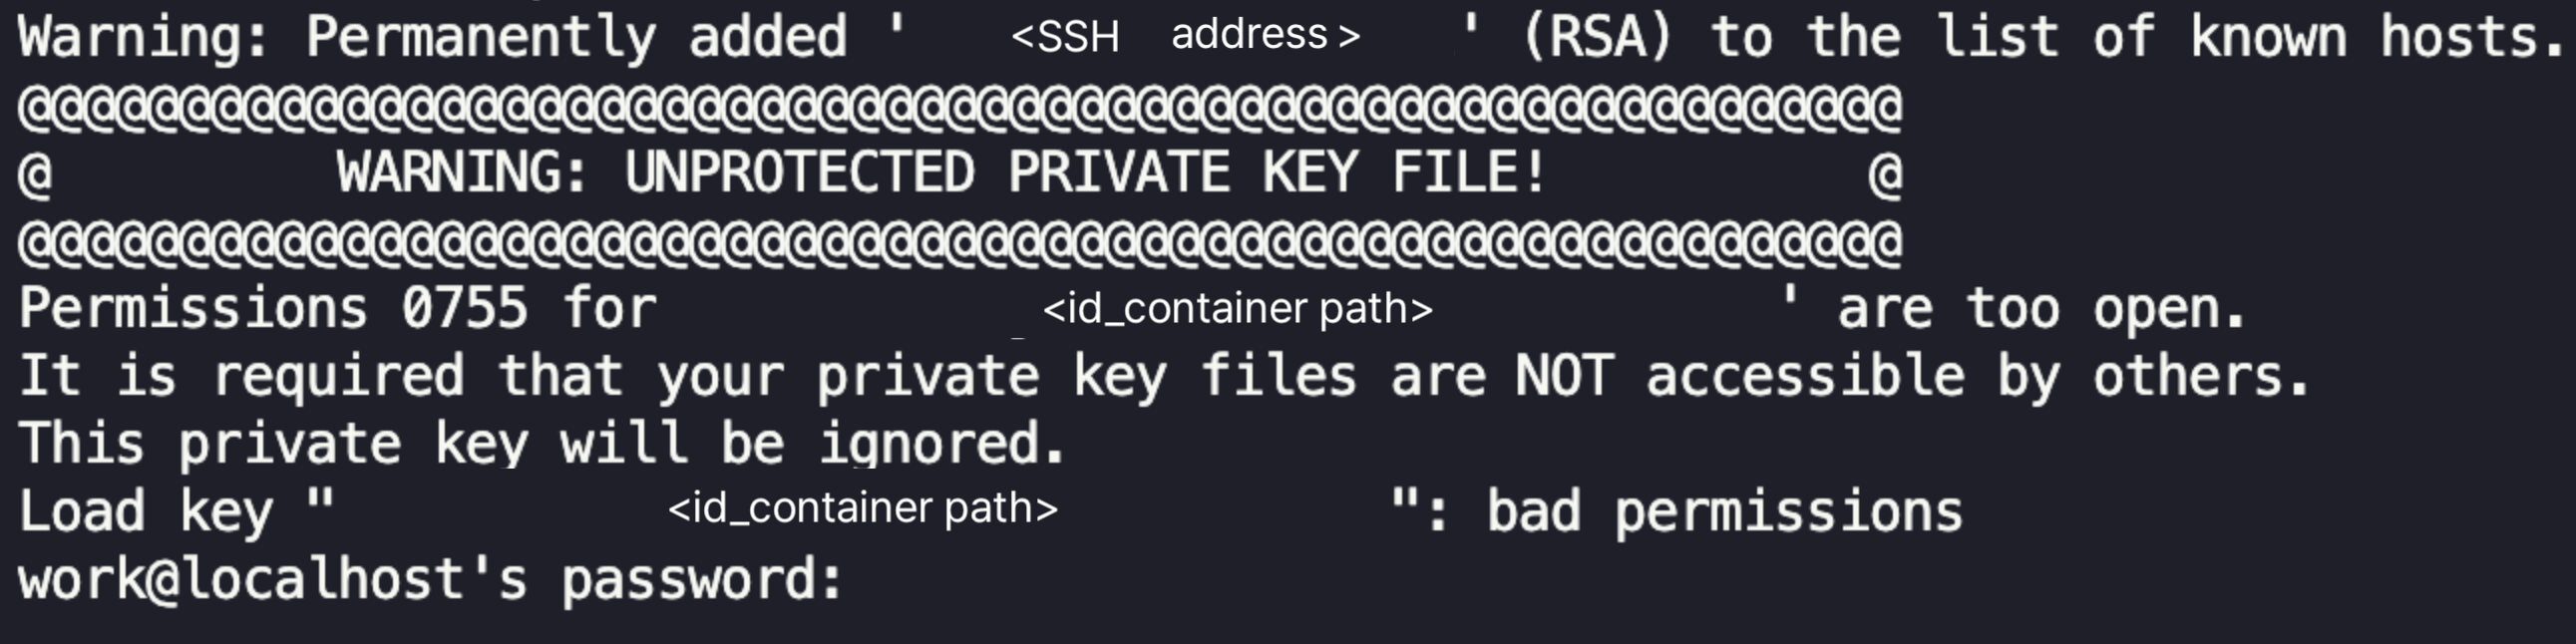
Note
If you receive the following warning message, try again after changing the
permission of the id_container to 600. (chmod 600 <id_container path>)
For Windows / FileZilla
Backend.AI Web-UI app supports OpenSSH-based public key connection (RSA2048).
To access with a client such as PuTTY on Windows, a private key must be
converted into a ppk file through a program such as PuTTYgen. You can refer
to the following link for the conversion method:
https://wiki.filezilla-project.org/Howto. For easier explanation, this section
will describe how to connect to SFTP through FileZilla client on Windows.
Refer to the connection method on Linux/Mac, create a compute session, check the
connection port and download id_container. id_container is an
OpenSSH-based key, so if you use a client that supports only Windows or ppk type
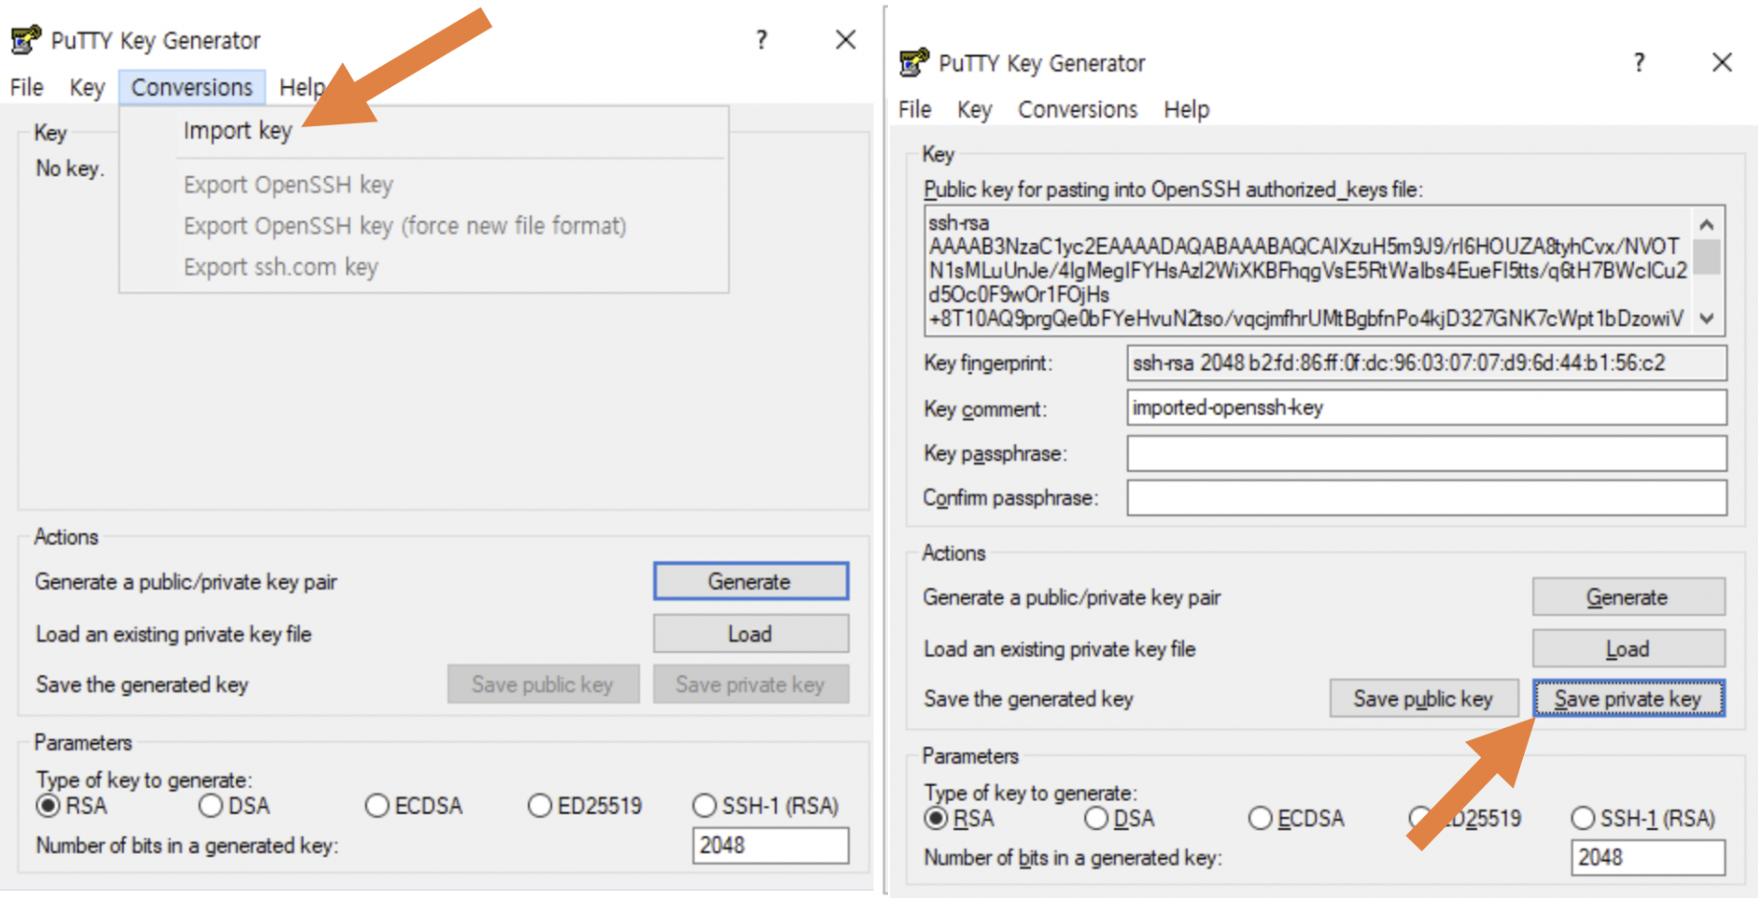
keys, you must convert it. Here, we will convert through the PuTTYgen program
installed with PuTTY. After running the PuTTYgen, click on the import key in the
Conversions menu. Select the downloaded id_container file from the file open
dialog. Click the Save private key button of PuTTYGen and save the file with the
name id_container.ppk.
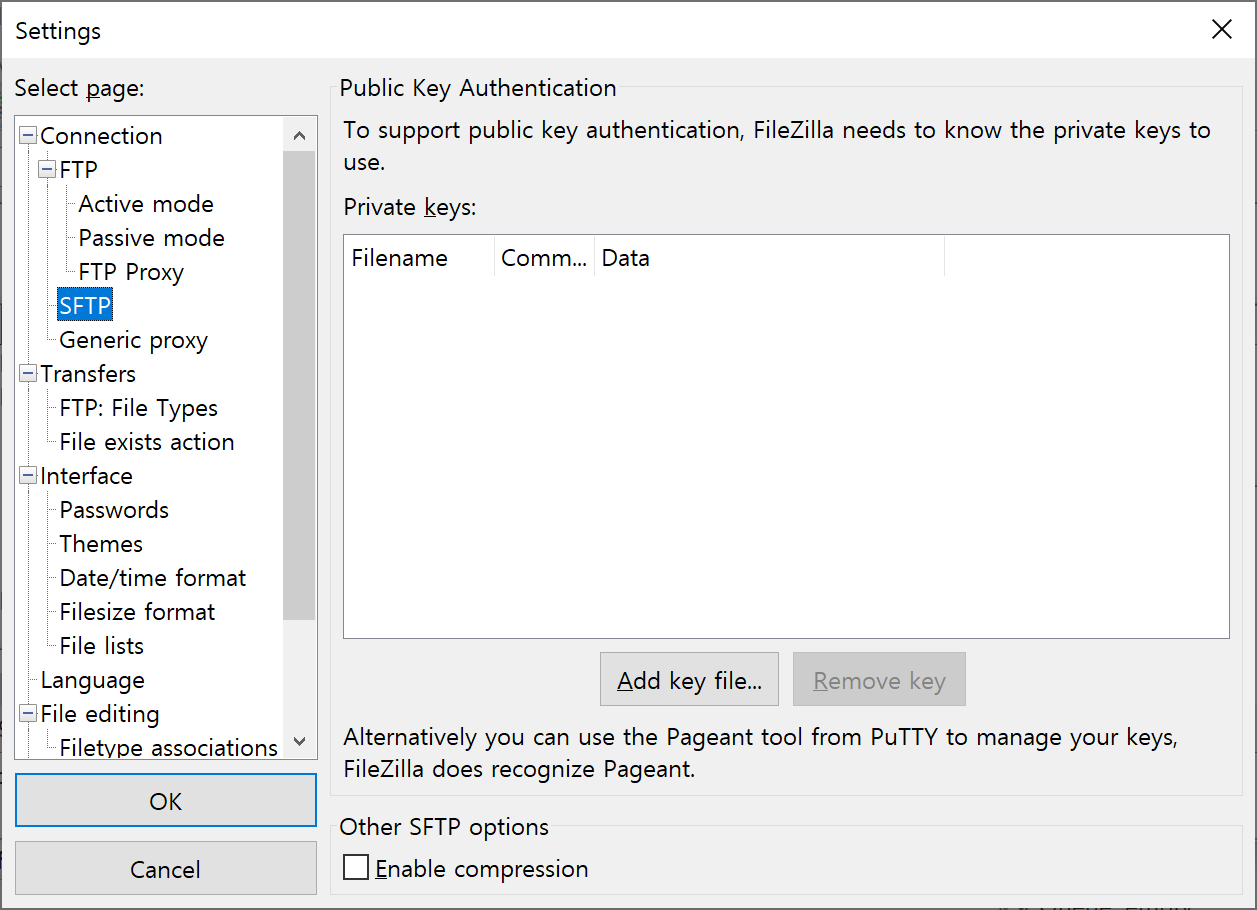
After launching the FileZilla client, go to the Settings-Connection-SFTP
and register the key file id_container.ppk (id_container for clients
supporting OpenSSH).
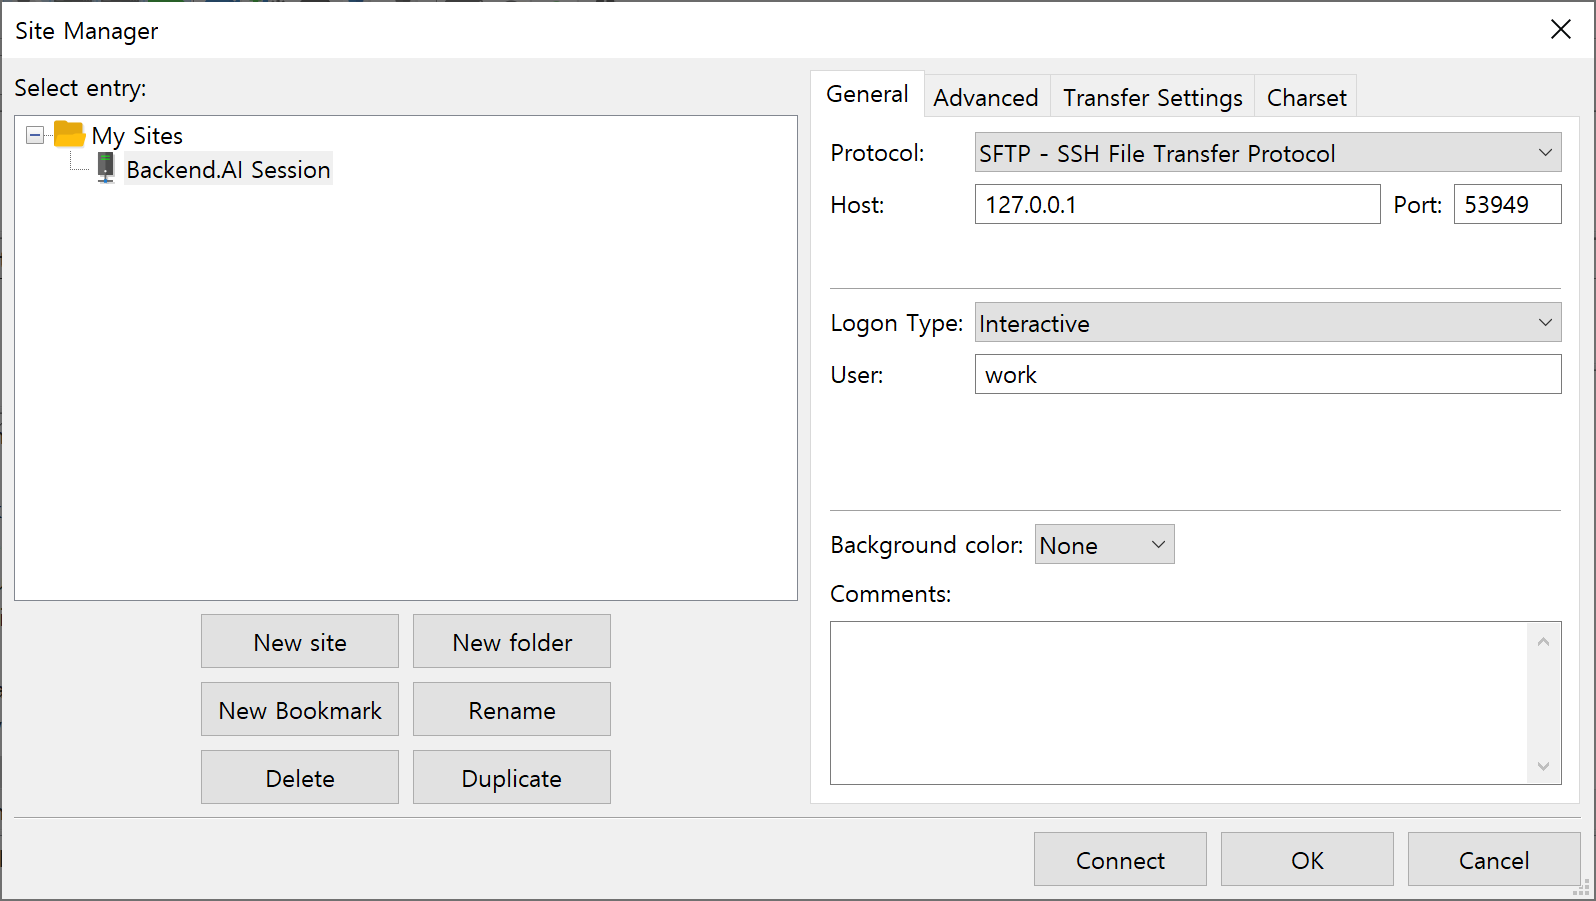
Open Site Manager, create a new site, and enter the connection information as follows.
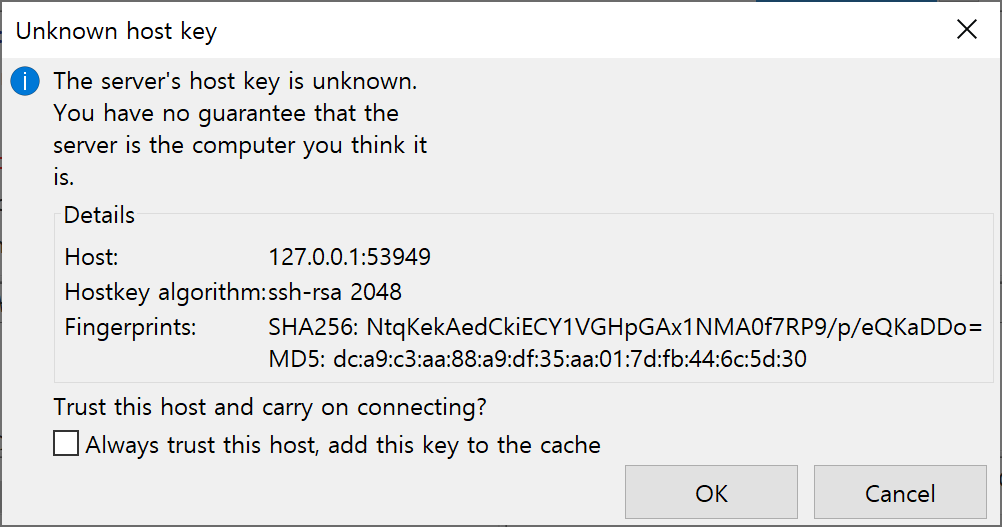
When connecting to a container for the first time, the following confirmation popup may appear. Click the OK button to save the host key.
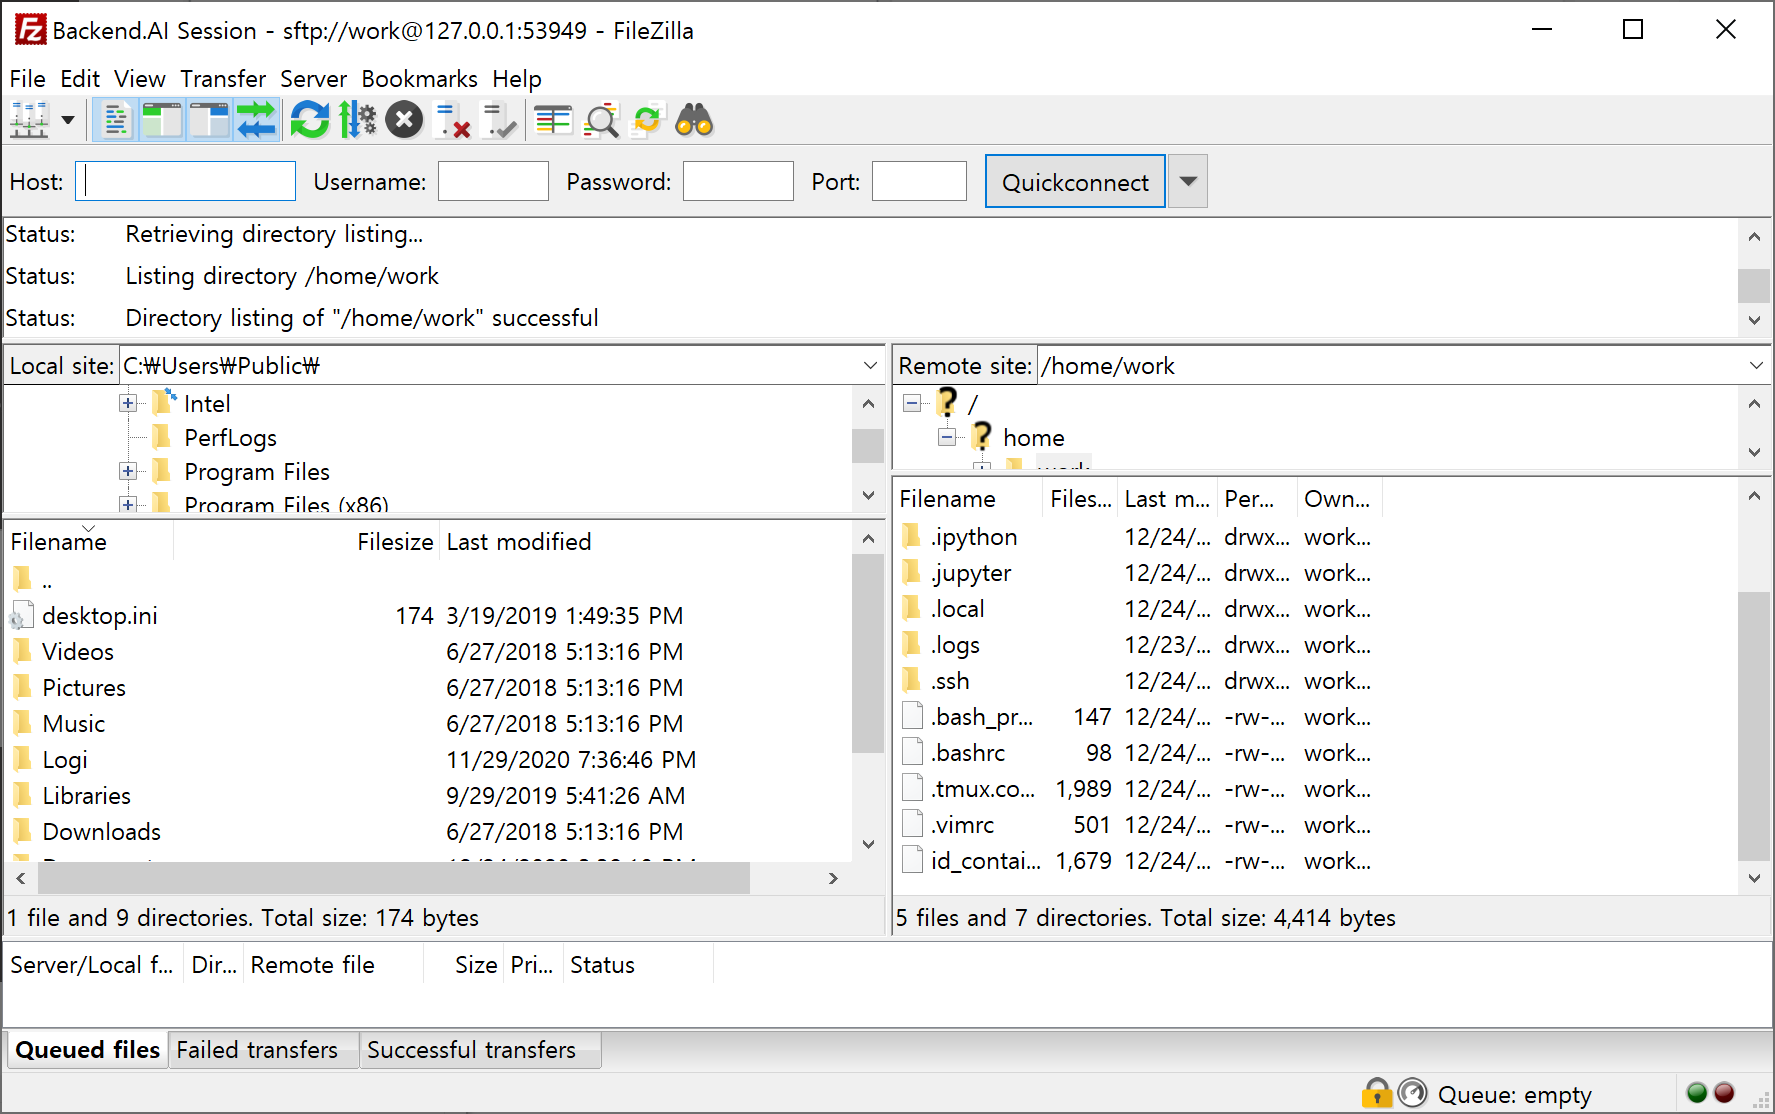
After a while, you can see that the connection is established as follows. You
can now transfer large files to /home/work/ or other mounted storage folder
with this SFTP connection.
For Visual Studio Code
Backend.AI supports to develop with the local Visual Studio Code through SSH/SFTP connection to a compute session. Once connected, you can interact with files and folders anywhere on the compute session. In this section, we will learn how to do it.
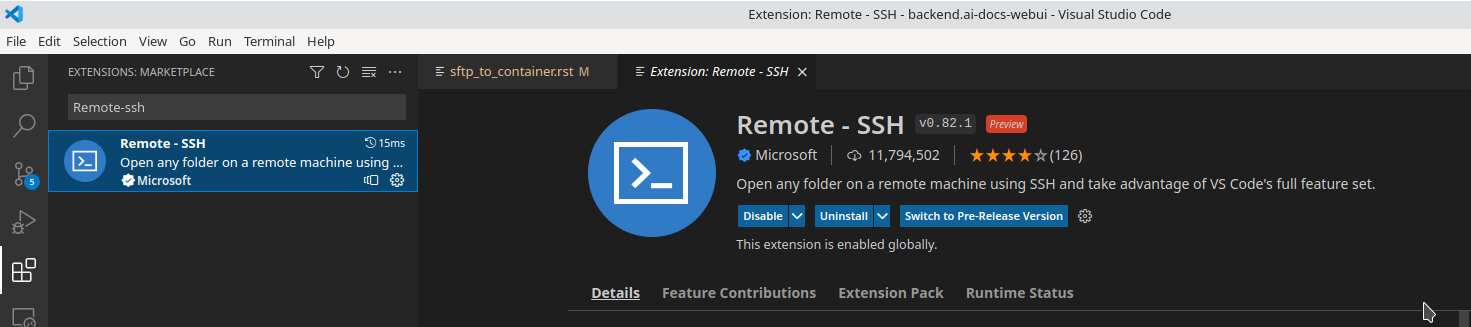
First, you should install Visual Studio Code and the Remote Development extension pack.
Link: https://aka.ms/vscode-remote/download/extension
After installing the extension, you should configure the SSH connection for the compute session. In the VSCode Remote Connection dialog, click the copy icon button to copy the Visual Studio Code remote SSH password. Also, remember the port number.
Then, set the SSH config file. Edit the ~/.ssh/config file (for Linux/Mac)
or C:\Users\[user name]\.ssh\config (for Windows) and add the following block.
For convenience, we set the hostname to bai-vscode. It can be changed to any alias.
Host bai-vscode
   User work
   Hostname 127.0.0.1
   # write down the port number that you remembered
   Port 49335
   StrictHostKeyChecking no
   UserKnownHostsFile /dev/null
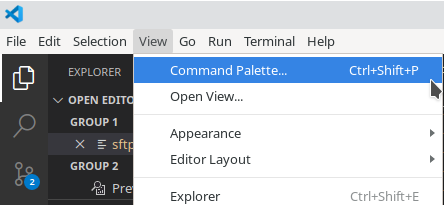
Now in the Visual Studio Code, select the Command Palette... from View menu.
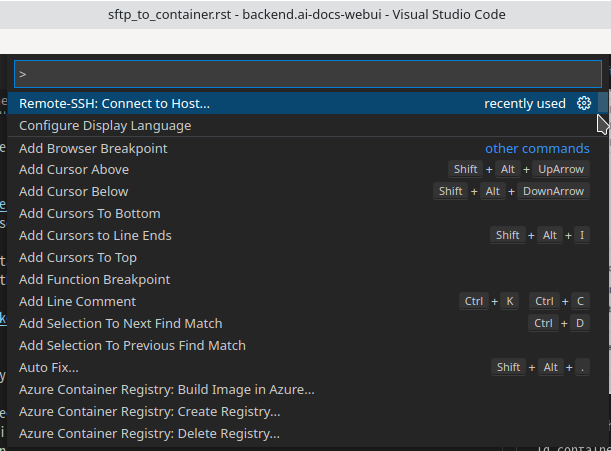
Visual Studio Code can automatically detect the type of host you are connecting to. Let's choose Remote-SSH: Connect to Host....
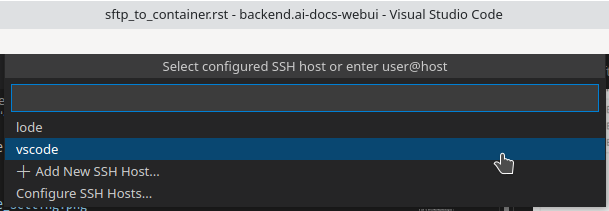
You will see the list of hosts in .ssh/config. Please select the host to
connect, in this case, vscode.
Selecting the host name will lead you to access the remote compute session. After you are connected, you will see an empty window. You can always refer to the Status bar to see which host you are connected to.

You can then open any folder or workspace on the remote host by accessing File > Open... or File > Open Workspace... menu just as you usually would do!
Establish SSH connection with Backend.AI client package
This document describes how to establish an SSH connection to a compute session in environments where a graphical user interface (GUI) cannot be used.
Typically, GPU nodes that runs compute sessions (containers) cannot be accessed directly from the outside. Therefore, in order to establish an SSH or sFTP connection to a compute session, a local proxy that creates a tunnel needs to be launched to relay the connection between the user and the session. Using the Backend.AI Client package, this process is relatively simple to configure.
Prepare Backend.AI Client package
Prepare with Docker image
The Backend.AI Client package is available as a Docker image. You can pull the image from the Docker Hub with the following command:
$ docker pull lablup/backend.ai-client
$
$ # If you want to use the specific version, you can pull the image with the following command:
$ docker pull lablup/backend.ai-client:<version>
The version of Backend.AI server can be found in "About Backend.AI" menu that appears when you click on the person icon on the top right corner of the Web UI.

Run the Docker image with the following command:
$ docker run --rm -it lablup/backend.ai-client bash
Check if backend.ai command is available in the container. If it is
available, the help message will be displayed.
$ backend.ai
Prepare directly from host with a Python virtual environment
If you cannot or do not want to use Docker, you can install the Backend.AI Client package directly on your host machine. Prerequisites are:
The required version of Python may vary depending on the Backend.AI Client version. You can check the compability matrix at https://github.com/lablup/backend.ai#python-version-compatibility.
clangcompiler might be neededzstdpackage might be needed if you are usingindygregPython binary.
It is recommended to use a Python virtual environment to install the packages.
One way is to use the statically-built Python binary from the indygreg
repository. Download the binary that matches your local machine architecture
from the following page and unzip it.
https://github.com/indygreg/python-build-standalone/releases
If you are using a popular x86-based Ubuntu environment, you can download and extract it as follows:
$ wget https://github.com/indygreg/python-build-standalone/releases/download/20240224/cpython-3.11.8+20240224-x86_64-unknown-linux-gnu-pgo-full.tar.zst
$ tar -I unzstd -xvf *.tar.zst
After unarchiving the binary, python directory will be created under the
current directory. You can check the version of the downloaded Python by running
the following command.
$ ./python/install/bin/python3 -V
Python 3.11.8
To avoid affecting other Python environments on the system, it is recommended to
create a separate Python virtual environment. When you run the following
command, a Python virtual environment will be created under the directory
.venv..
$ ./python/install/bin/python3 -m venv .venv
Activate the virtual environment. Since a new virtual environment has been
activated, only the pip and setuptools packages will be installed when
you run the pip list command.
$ source .venv/bin/activate
(.venv) $ pip list
Package    Version
---------- -------
pip        24.0
setuptools 65.5.0
Now, install the Backend.AI Client package. Install the client package according
to the server version. Here, we assume that the version is 23.09. If an
installation-related error occurs with the netifaces package, you may need to
lower the versions of pip and setuptools. Check if the backend.ai
command is available.
(.venv) $ pip install -U pip==24.0 && pip install -U setuptools==65.5.0
(.venv) $ pip install -U backend.ai-client~=23.09
(.venv) $ backend.ai
Setting up server connection for CLI
Create a .env file and add the following content. Use the same address for
webserver-url that you use to connect to the Web UI service from your
browser.
BACKEND_ENDPOINT_TYPE=session
BACKEND_ENDPOINT=<webserver-url>
Run the following CLI command to connect to the server. Enter the email and
password that you use to log in from your browser. If everything goes well, you
will see the message Login succeeded.
$ backend.ai login
User ID: myuser@test.com
Password:
✓ Login succeeded.
SSH/SCP Connection to Computation Session
Create a compute session from the browser by mounting the folder where you want
to copy the data. You can create the session using CLI as well, but for
convenience, let's assume that you have created it from the browser. Remember
the name of the created compute session. Here, we assume it is
ibnFmWim-session.
If you simply want to SSH, execute the following command:
$ backend.ai ssh ibnFmWim-session
∙ running a temporary sshd proxy at localhost:9922 ...
work@main1[ibnFmWim-session]:~$
If you want to download the SSH key file and explicitly run the ssh command, you need to first run the following command to launch a local proxy service that relays connection from the local machine to the computation session. You can specify the port (9922) to use on the local machine with the b option.
$ backend.ai app ibnFmWim-session sshd -b 9922
∙ A local proxy to the application "sshd" provided by the session "ibnFmWim-session" is available at:
  tcp://127.0.0.1:9922
Open another terminal window on your local machine. Move to the working
directory where the .env file is located, and download the SSH key
automatically generated in the compute session.
$ source .venv/bin/activate  # Reactivate the Python virtual environment as this is a different terminal
$ backend.ai session download ibnFmWim-session id_container
Downloading files: 3.58kbytes [00:00, 352kbytes/s]
✓ Downloaded to /*/client.
You can use the downloaded key to SSH as follows. Since you launched the local
proxy on port 9922, the connection address should be 127.0.0.1 and the port
should be 9922. Use the user account work for the connection.
$ ssh \
    -o StrictHostKeyChecking=no \
    -o UserKnownHostsFile=/dev/null \
    -i ./id_container \
    -p 9922 \
    work@127.0.0.1
Warning: Permanently added '[127.0.0.1]:9922' (RSA) to the list of known hosts.
work@
Similarly, you can use the scp command to copy files. In this case, you
should copy the files to the mounted folder within the compute session to
preserve them even after the session has been terminated.
$ scp \
    -o StrictHostKeyChecking=no \
    -o UserKnownHostsFile=/dev/null \
    -i ./id_container \
    -P 9922 \
    test_file.xlsx work@127.0.0.1:/home/work/myfolder/
Warning: Permanently added '[127.0.0.1]:9922' (RSA) to the list of known hosts.
test_file.xlsx
When all the tasks are completed, press Ctrl-C on the first terminal to
cancel the local proxy service.