Model Serving
Model Service
Note
This feature is supported in Enterprise version only.
Backend.AI not only facilitates the construction of development environments and resource management during the model training phase, but also supports the model service feature from version 23.09 onwards. This feature allows end-users (such as AI-based mobile apps and web service backends) to make inference API calls when they want to deploy the completed model as an inference service.
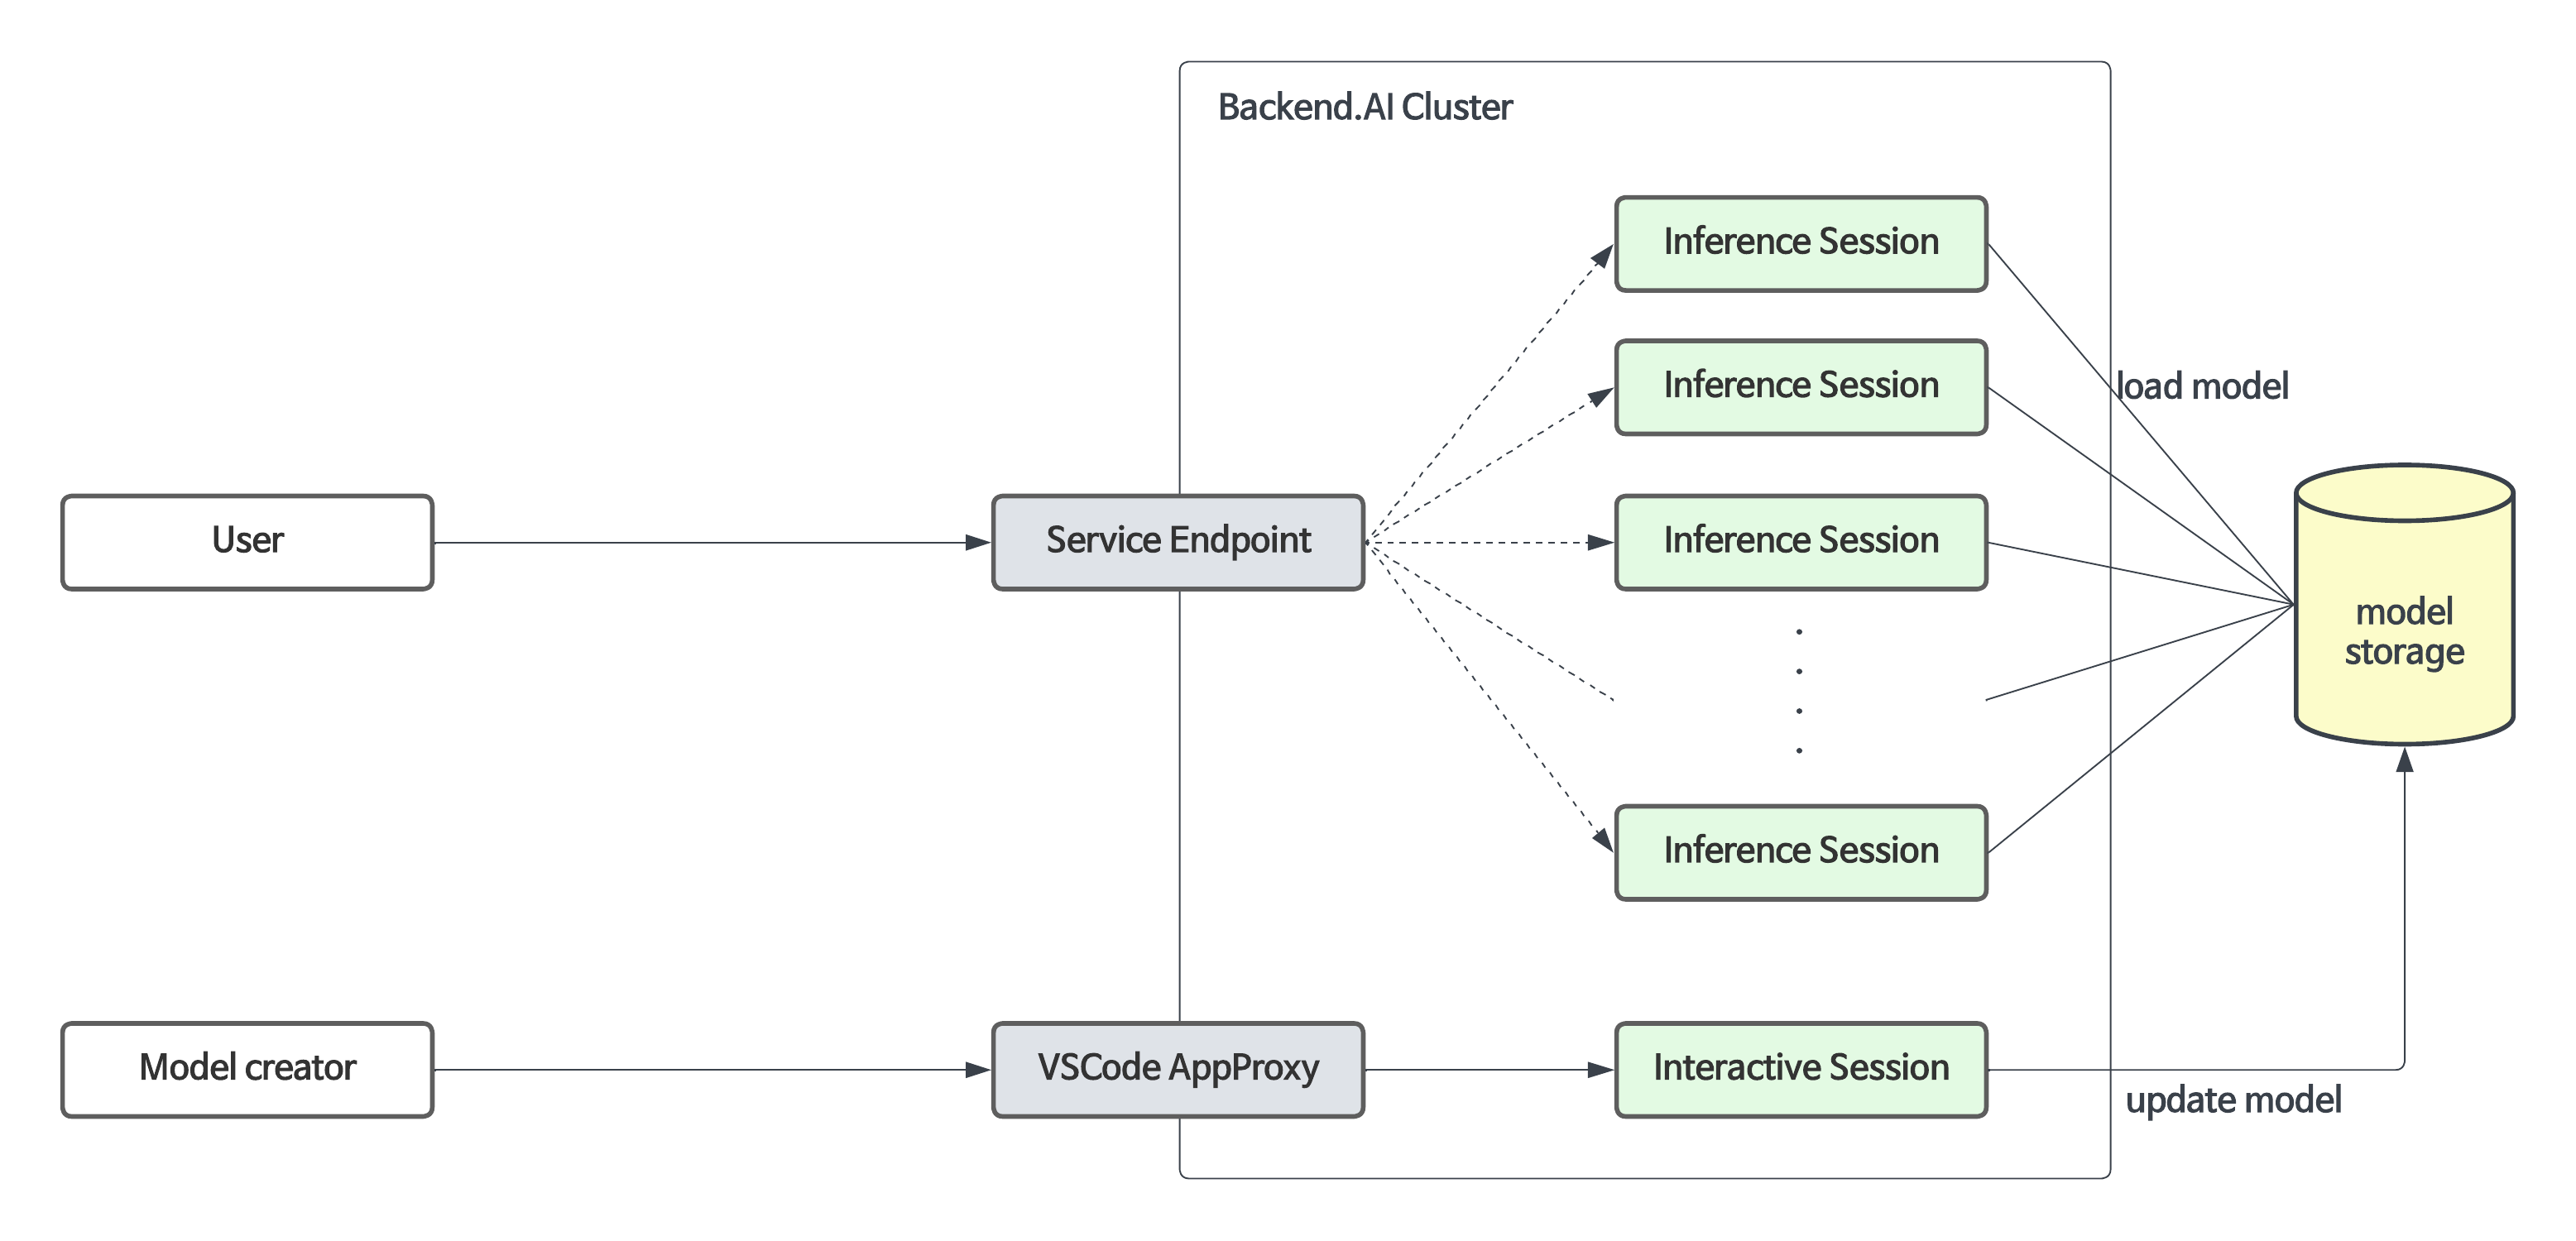
The Model Service extends the functionality of the existing training compute sessions, enabling automated maintenance, scaling, and permanent port and endpoint address mapping for production services. Developers or administrators only need to specify the scaling parameters required for the Model Service, without the need to manually create or delete compute sessions.
Configuring and limitations of model service in version 23.03 and earlier
Although the model serving-specific feature is officially supported from version 23.09, you can still use model service in earlier versions.
For example, in version 23.03, you can configure a model service by modifying the compute session for training in the following way:
Add pre-opened ports during session creation to map the running server port inside the session for model serving. (For instructions on how to use preopen ports, refer to this Set Preopen Ports.)
Check 'Open app to public' to allow the service mapped to the pre-opened port to be publicly accessible. (For detailed information about "Open app to public," refer to this Open app to public.)
However, there are certain limitations in version 23.03:
Sessions do not automatically recover if they are terminated due to external factors such as idle timeout or system errors.
The app port changes every time a session is restarted.
If sessions are repeatedly restarted, the idle ports may be exhausted.
The official Model Service feature in version 23.09 resolves these limitations. Therefore, starting from version 23.09, it is recommended to create/manage Model Services through the model serving menu whenever possible. The use of pre-opened ports is recommended only for development and testing purposes.
Guide to Steps for Using Model Service
To use the Model Service, you need to follow the steps below:
Create a model definition file.
Upload the model definition file to the model type folder.
Create/Validate the Model Service.
(If the Model Service is not public) Obtain a token.
(For end users) Access the endpoint corresponding to the Model Service to verify the service.
(If needed) Modify the Model Service.
(If needed) Terminate the Model Service.
Creating a Model Definition File
Note
From 24.03, you can configure model definition file name. But if you don't input any other input field in model definition file path, then the system will regard it as
model-definition.ymlormodel-definition.yaml.
The model definition file contains the configuration information required by the Backend.AI system to automatically start, initialize, and scale the inference session. It is stored in the model type folder independently from the container image that contains the inference service engine. This allows the engine to serve different models based on specific requirements and eliminates the need to build and deploy a new container image every time the model changes. By loading the model definition and model data from the network storage, the deployment process can be simplified and optimized during automatic scaling.
The model definition file follows the following format:
models:
  - name: "simple-http-server"
    model_path: "/models"
    service:
      start_command:
        - python
        - -m
        - http.server
        - --directory
        - /home/work
        - "8000"
      port: 8000
      health_check:
        path: /
        interval: 10.0
        max_retries: 10
        max_wait_time: 15.0
        expected_status_code: 200
        initial_delay: 60.0
Key-Value Descriptions for Model Definition File
Note
Fields without "(Required)" mark are optional.
name(Required): Defines the name of the model.model_path(Required): Addresses the path of where model is defined.service: Item for organizing information about the files to be served (includes command scripts and code).pre_start_actions: Item for organizing preceding commands or actions to be executed before thestart_command.start_command(Required): Specify the command to be executed in model serving. Can be a string or a list of strings.port(Required): Container port for the model service (e.g.,8000,8080).health_check: Configuration for periodic health monitoring of the model service. When configured, the system automatically checks if the service is responding correctly and removes unhealthy instances from traffic routing.path(Required): HTTP endpoint path for health check requests (e.g.,/health,/v1/health).interval(default:10.0): Time in seconds between consecutive health checks.max_retries(default:10): Number of consecutive failures allowed before marking the service asUNHEALTHY. The service continues receiving traffic until this threshold is exceeded.max_wait_time(default:15.0): Timeout in seconds for each health check HTTP request. If no response is received within this time, the check is considered failed.expected_status_code(default:200): HTTP status code that indicates a healthy response. Common values:200(OK),204(No Content).initial_delay(default:60.0): Time in seconds to wait after container creation before starting health checks. This allows time for model loading, GPU initialization, and service warmup. Set higher values for large models (e.g.,300.0for 70B+ LLMs).
Note
Health checks are triggered by the app proxy coordinator's background task, which runs at
health_check_timer_interval(default:30seconds). If the model'sintervalis shorter than this, checks occur at the coordinator's interval instead.The examples below assume
health_check_timer_interval≤interval.
Understanding Health Check Behavior
The health check system monitors individual model service containers and automatically manages traffic routing based on their health status.
Container Created
      │
      ▼
┌─────────────────────────────────┐
│  Wait for initial_delay (60s)   │  ← Model loading, GPU init, warmup
│  Status: DEGRADED               │
│  No health checks during this   │
└─────────────────────────────────┘
      │
      ▼
Start Health Check Cycle
      │
      ▼
┌─────────────────────────────────┐
│  Every interval (10s):          │
│  HTTP GET → path ("/health")    │
└─────────────────────────────────┘
      │
      ▼
Wait up to max_wait_time (15s)
                │
     ┌──────────┴──────────┐
     ▼                     ▼
  Response             Timeout/Error
     │                     │
     ▼                     │
  Status ==                │
  expected?                │
     │                     │
    ┌┴┐                    │
    ▼ ▼                    │
    Y N                    │
    │ │                    │
    │ └─────────┬──────────┘
    │           ▼
    │      Consecutive
    │      failures +1
    │           │
    ▼           ▼
 HEALTHY     Failures > max_retries?
 (reset              │
 failures)     ┌─────┴─────┐
               ▼           ▼
              Yes          No
               │           │
               ▼           ▼
          UNHEALTHY      Keep current
          (removed       status
          from traffic
          internally)
Note
The internal health status (used for traffic routing) may not be immediately synchronized with the status displayed in the user interface.
Time to UNHEALTHY:
Initial startup:
initial_delay + interval × (max_retries + 1)Example with defaults: 60 + 10 × 11 = 170 seconds (about 3 minutes)
During operation (after healthy):
interval × (max_retries + 1)Example with defaults: 10 × 11 = 110 seconds (about 2 minutes)
Description for service action supported in Backend.AI Model serving
write_file: This is an action to create a file with the given file name and append control to it. the default access permission is644.arg/filename: Specify the file namebody: Specify the content to be added to the file.mode: Specify the file's access permissions.append: Set whether to overwrite or append content to the file asTrueorFalse.
write_tempfile: This is an action to create a file with a temporary file name (.py) and append content to it. If no value is specified for the mode, the default access permission is644.body: Specify the content to be added to the file.mode: Specify the file's access permissions.
run_command: The result of executing a command, including any errors, will be returned in following format (out: Output of the command execution,err: Error message if an error occurs during command execution)args/command: Specify the command to executed as an array. (e.g.python3 -m http.server 8080command goes to ["python3", "-m", "http.server", "8080"] )
mkdir: This is an action to create a directory by input pathargs/path: Specify the path to create a directory
log: This is an action to print out log by input messageargs/message: Specify the message to be displayed in the logs.debug: Set toTrueif it is in debug mode, otherwise set toFalse.
Uploading Model Definition File to Model Type Folder
To upload the model definition file (model-definition.yml) to the
model type folder, you need to create a virtual folder. When creating
the virtual folder, select the model type instead of the default
general type. Refer to the section on creating a storage
folder in the Data page for
instructions on how to create a folder.

After creating the folder, select the 'MODELS' tab in the Data page, click on the recently created model type folder icon to open the folder explorer, and upload the model definition file. For more information on how to use the folder explorer, please refer Explore Folder section.


Creating/Validating Model Service
Once the model definition file is uploaded to the virtual folder of the model type, you are ready to create the model service.
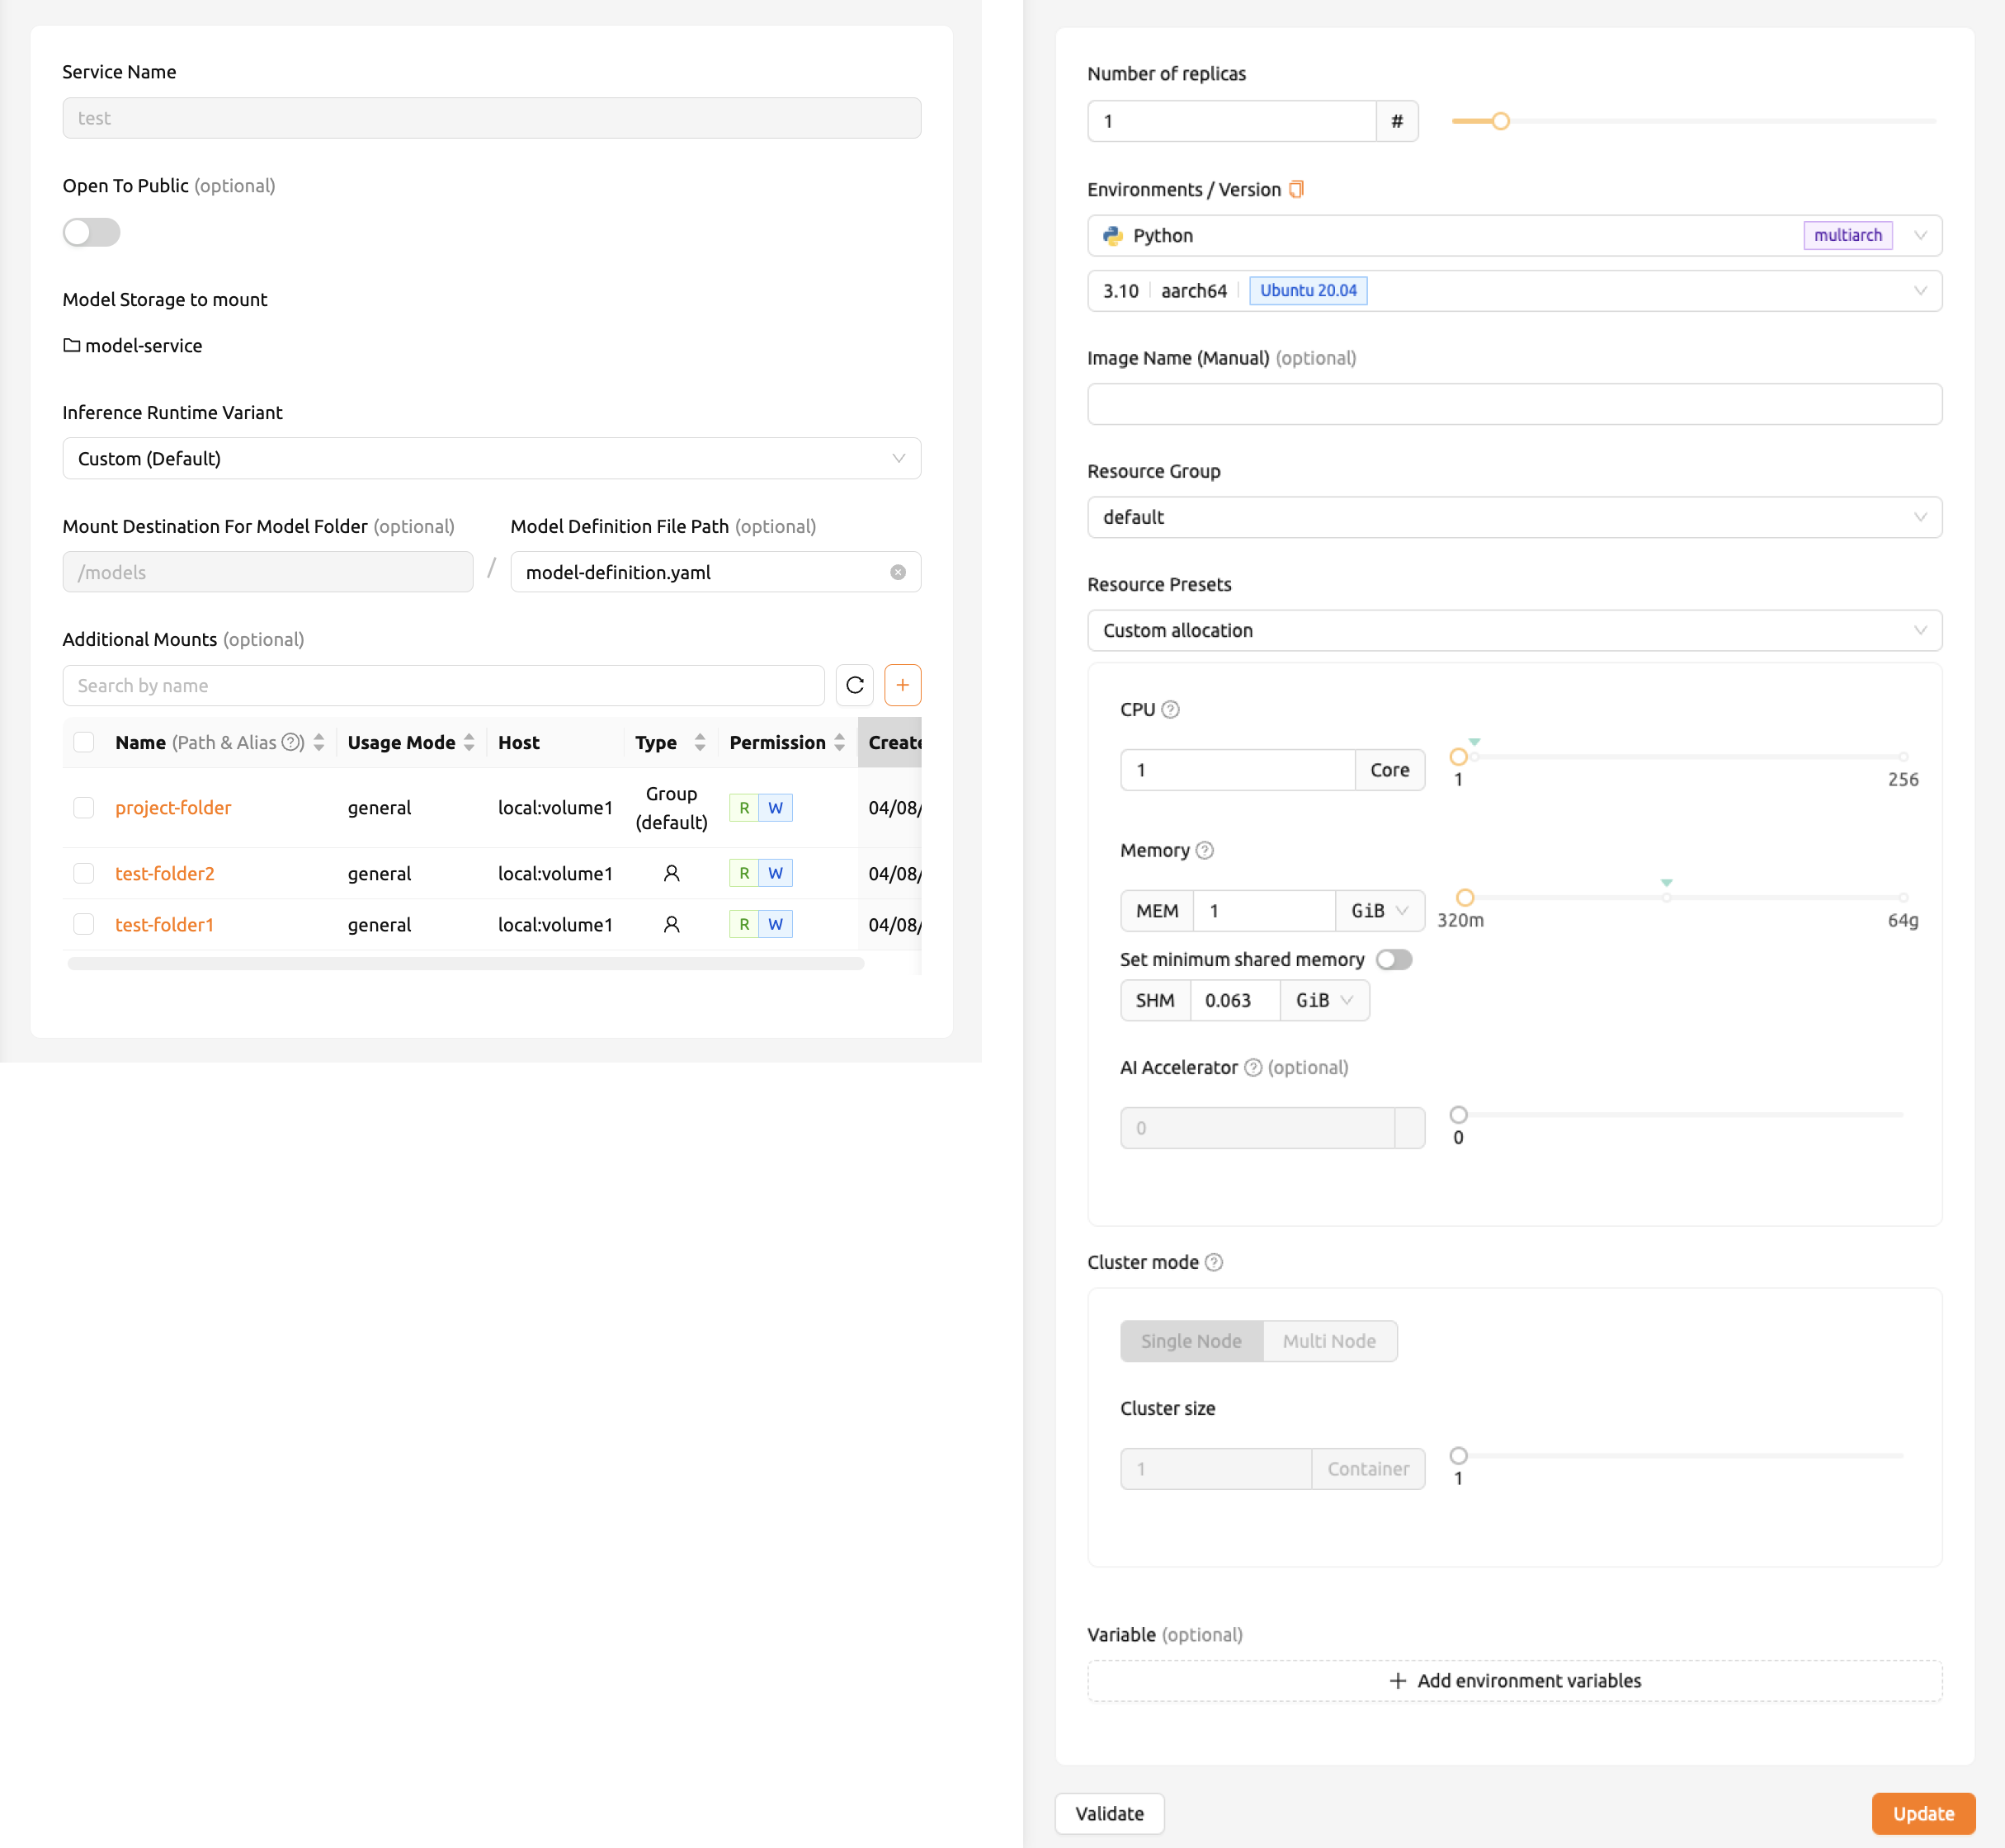
Click the 'Start Service' button on the Model Serving page. This will bring up a page where you can enter the required settings for creating the service.

First, provide a service name. For detailed explanations of each item, please refer to the following:
Open To Public: This option allows access to the model service without any separate token on the server where the service is to be hosted. By default, it is disabled.
Model Storage To Mount: This is model folder to mount, which contains model definition file inside the directory.
Inference Runtime Variant: This categorizes the type of models into four:
vLLM,NVIDIA NIM,Predefined Image Command,Custom.

For example, if you choose vLLM or NVIDIA NIM or Predefined Image Command as a runtime variant of model service,
there's no need to configure a model-definition file in your model folder to mount. Instead, you might have to set an additional environment variable.
For more information, please take a look at
Model Variant: Easily Serving Various Model Services.

Model Destination For Model Folder: This option allows aliasing path of model storage path to session corresponding to routing, which represents the service. default value is
/models.Model Definition File Path: You can also set model definition file as you uploaded in model storage path. The default value is
model-definition.yaml.Additional Mounts: Likewise session, service provides additional mounts. Please make sure that only you can mount general/data usage mode folder, not additional model folder.

Then set number of replicas and select environments and resource group. The resource group is a collection of resources that can be allocated to the model service.
Number of replicas: This setting serves as the basis for determining the number of routing sessions to maintain for the current service. If you change the value of this setting, the manager can create a new replica session or terminate a running session by referring to the number of existing replica sessions.
Environment / Version: You can configure the execution environment for the dedicated server of the model service. Currently, even if the service has multiple routings, it will be executed in a single environment only. (Support for multiple execution environments will be added in a future update)
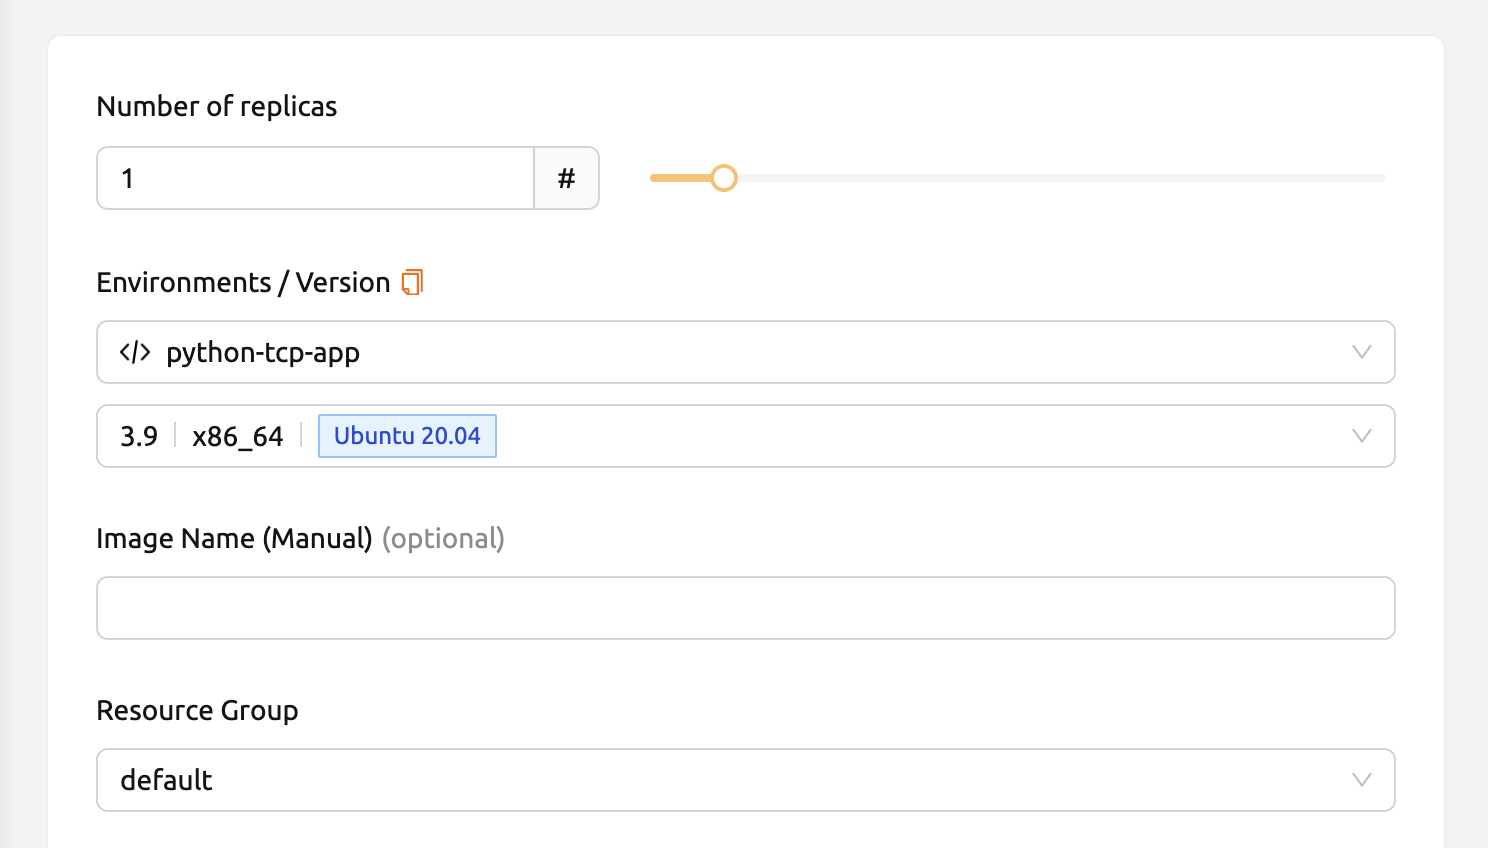
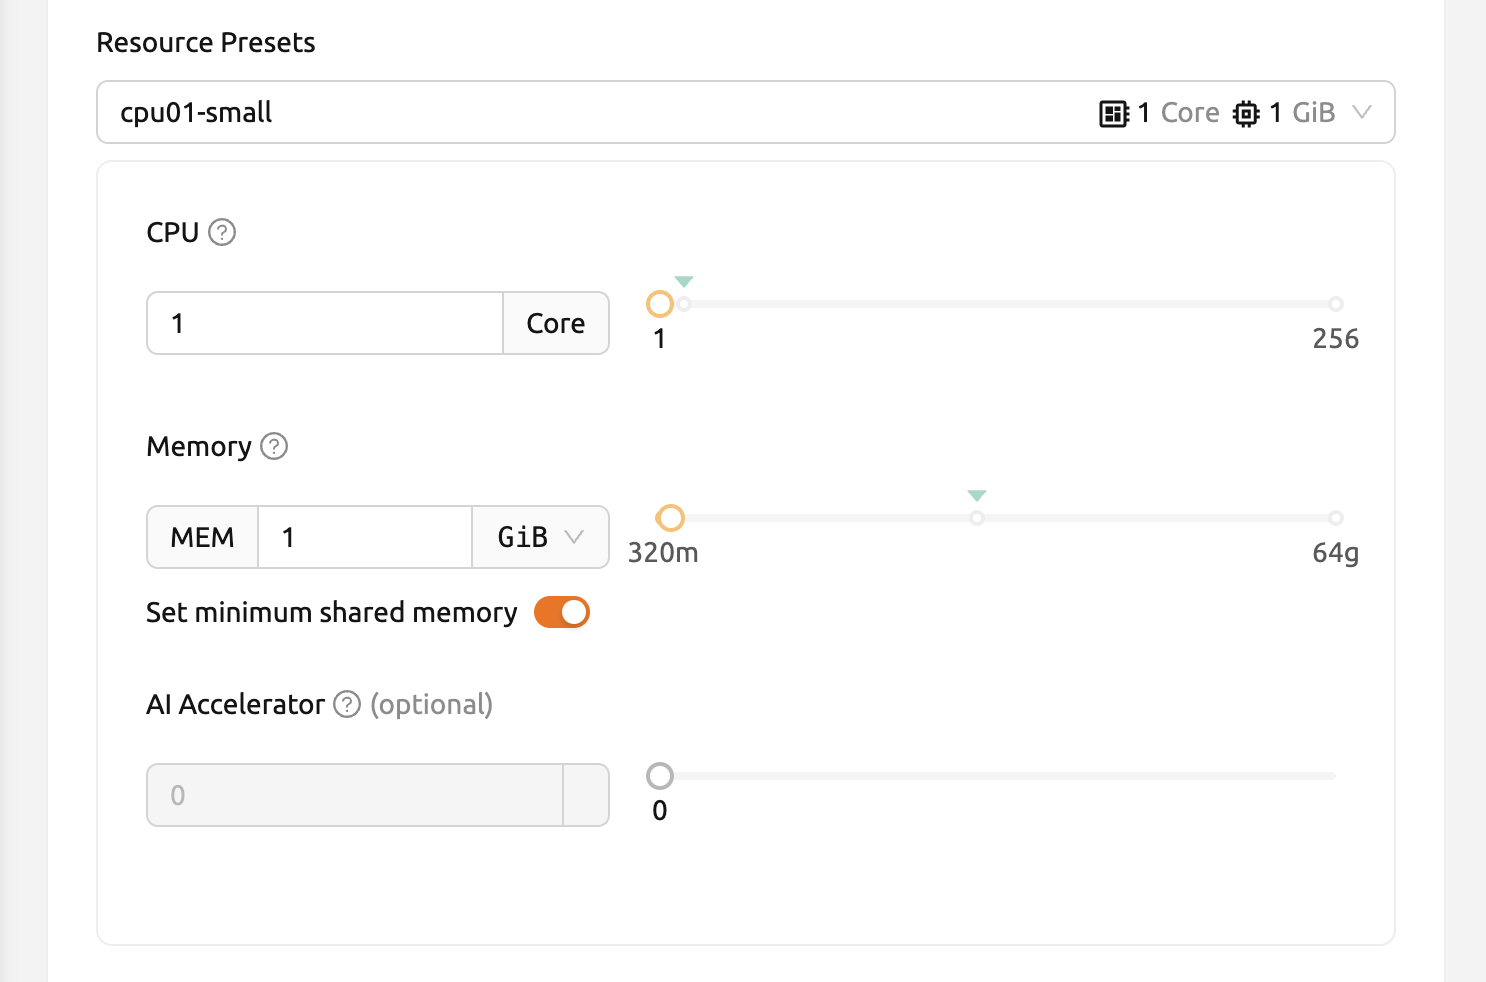
Resource Presets: Allows you to select the amount of resources to allocate from the model service. Resource contains CPU, RAM, and AI accelerator, as known as GPU.
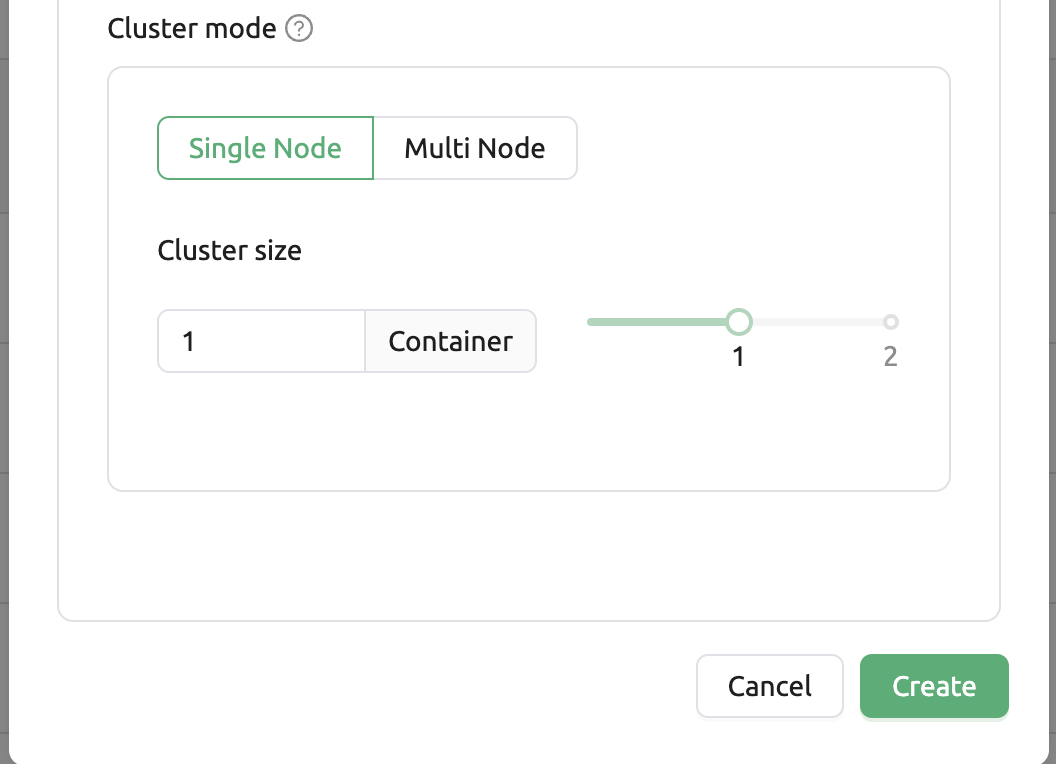
Single Node: When running a session, the managed node and worker nodes are placed on a single physical node or virtual machine.
Multi Node: When running a session, one managed node and one or more worker nodes are split across multiple physical nodes or virtual machines.
Variable: In this section, you can set environment variable when starting a model service. It is useful when you trying to create a model service using runtime variant. some runtime variant needs certain environment variable setting before execution.
Before creating model service, Backend.AI supports validation feature to check
whether execution is available or not(due to any errors during execution).
By clicking the 'Validate' button at the bottom-left of the service launcher,
a new popup for listening to validation events will pop up. In the popup modal,
you can check the status through the container log. When the result is set to
Finished, then the validation check is finished.

Note
The result Finished doesn't guarantee that the execution is successfully done.
Instead, please check the container log.
Handling Failed Model Service Creation
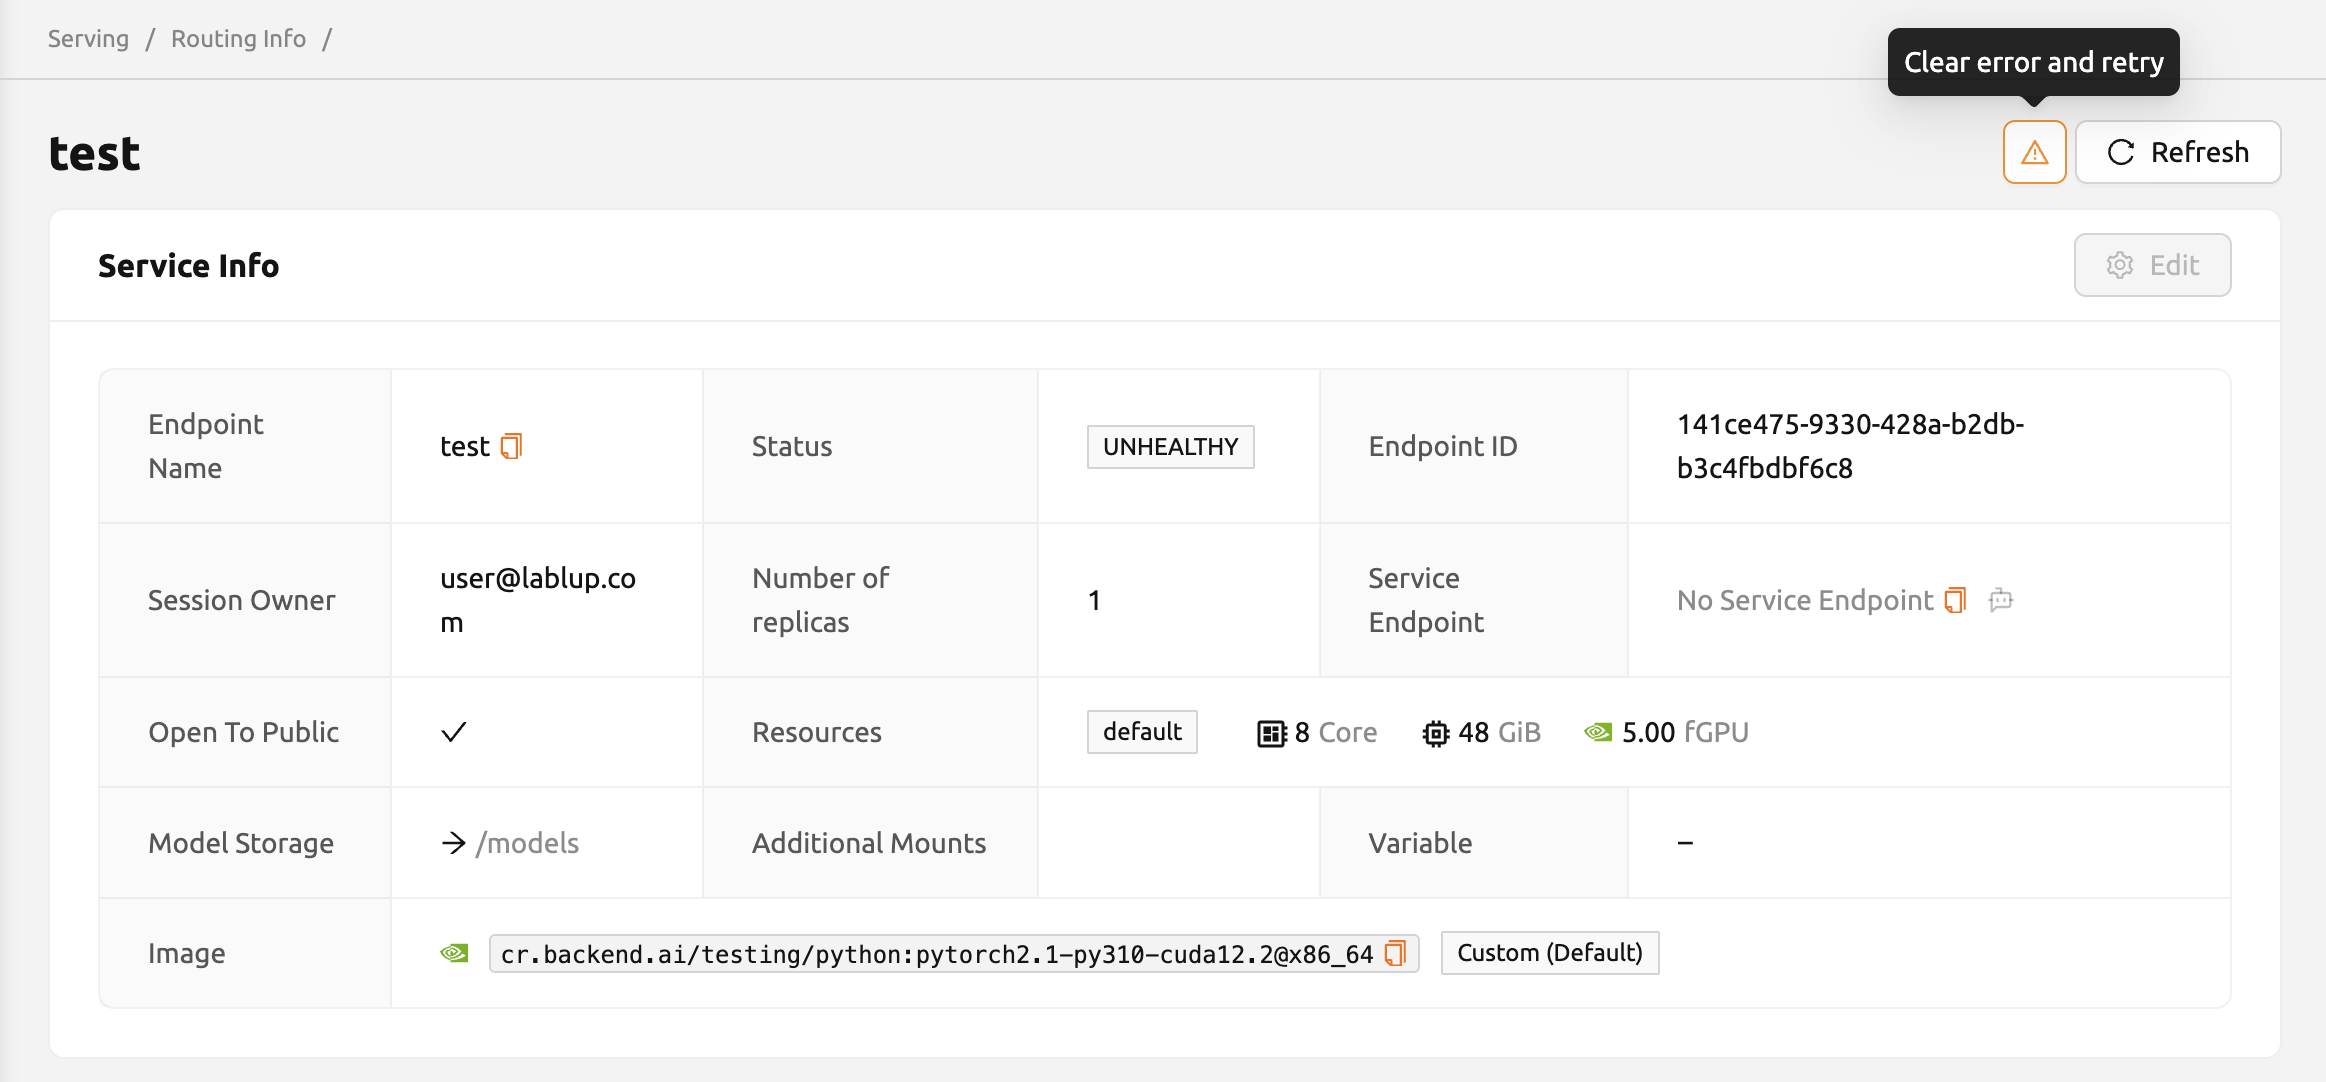
If the status of the model service remains UNHEALTHY, it indicates
that the model service cannot be executed properly.
The common reasons for creation failure and their solutions are as follows:
Insufficient allocated resources for the routing when creating the model service
Solution: Terminate the problematic service and recreate it with an allocation of more sufficient resources than the previous settings.
Incorrect format of the model definition file (
model-definition.yml)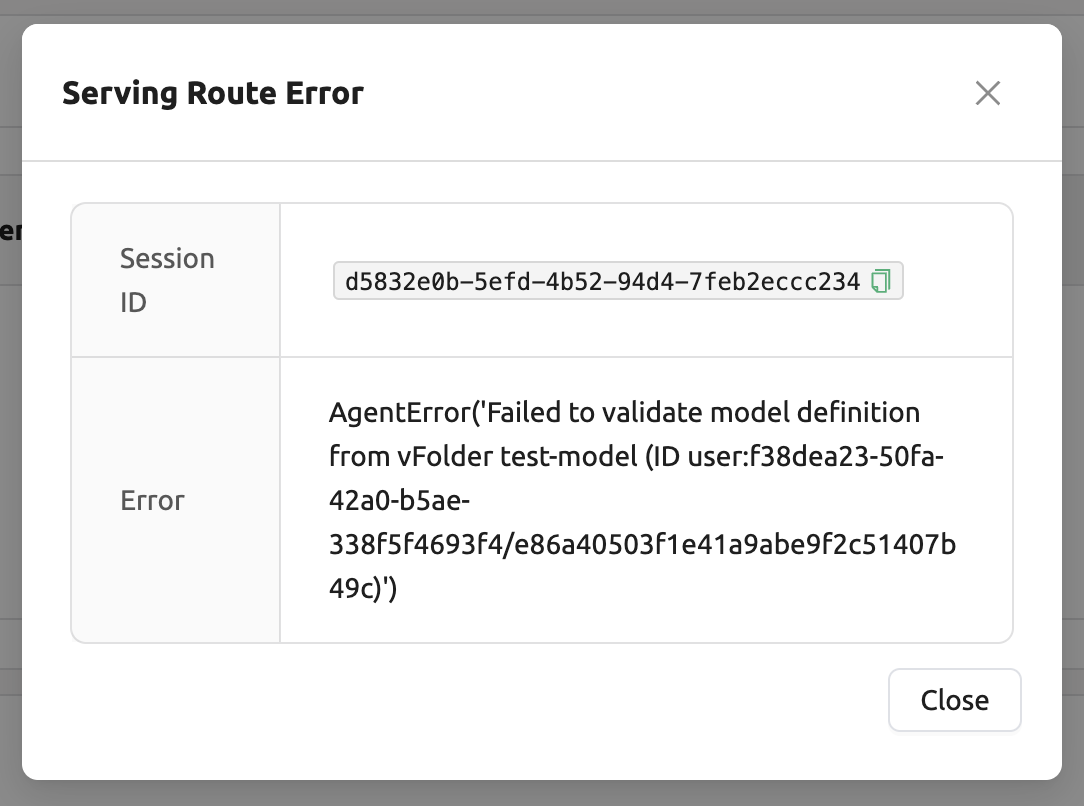
Solution: Verify the format of the model definition file and if any key-value pairs are incorrect, modify them and overwrite the file in the saved location. Then, click 'Clear error and Retry' button to remove all the error stacked in routes info table and ensure that the routing of the model service is set correctly.
Auto Scaling Rules
You can configure auto scaling rules for the model service. Based on the defined rules, the number of replicas is automatically reduced during low using to conserve resources, and increased during high usage to prevent request delays of failures.
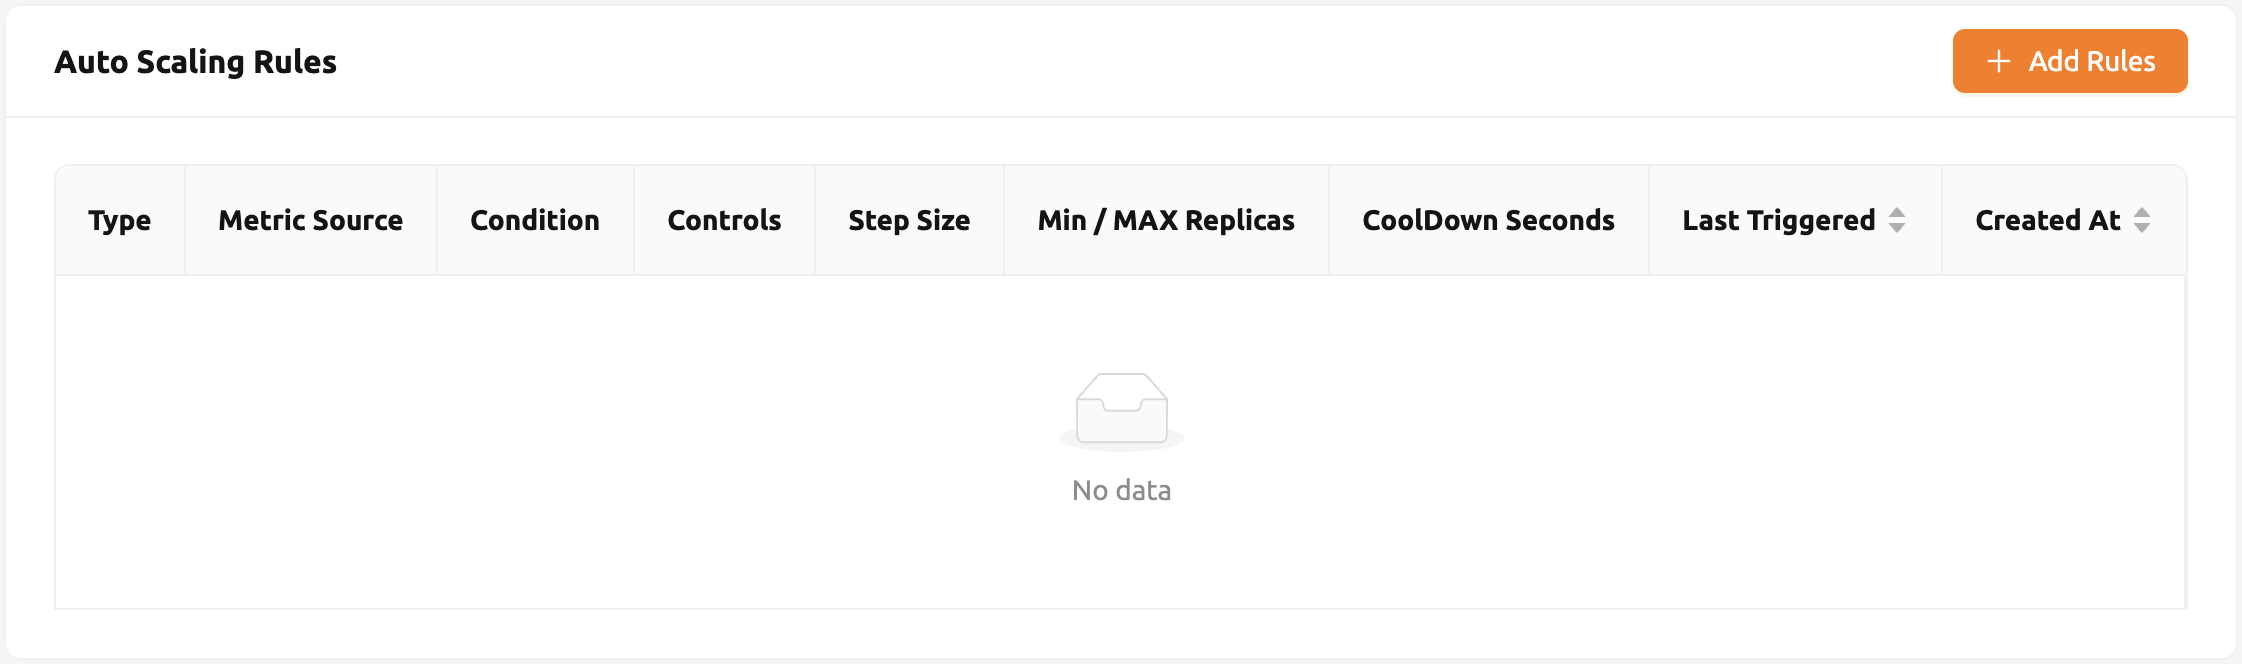
Click the 'Add Rules' button to add a new rule. When you click the button, a modal appears when you can add a rule. Each field in the modal is described below:
Type: Define the rule. Select either 'Scale Up' or 'Scale Down' based on the scope of the rule.
Metric Source: Inference Framework or kernel.
Inference Framework: Average value taken from every replicas. Supported only if both AppProxy reports the inference metrics.
Kernel: Average value taken from every kernels backing the endpoint.
Condition: Set the condition under which the auto scaling rule will be applied.
Metric Name: The name of the metric to be compared. You can freely input any metric supported by the runtime environment.
Comparator: Method to compare live metrics with threshold value.
LESS_THAN: Rule triggered when current metric value goes below the threshold defined
LESS_THAN_OR_EQUAL: Rule triggered when current metric value goes below or equals the threshold defined
GREATER_THAN: Rule triggered when current metric value goes above the threshold defined
GREATER_THAN_OR_EQUAL: Rule triggered when current metric value goes above or equals the threshold defined
Threshold: A reference value to determine whether the scaling condition is met.
Step Size: Size of step of the replica count to be changed when rule is triggered. Can be represented as both positive and negative value. when defined as negative, the rule will decrease number of replicas.
Max/Min Replicas: Sets a maximum/minimum value for the replica count of the endpoint. Rule will not be triggered if the potential replica count gets above/below this value.
CoolDown Seconds: Durations in seconds to skip reapplying the rule right after rule is first triggered.

Generating Tokens
Once the model service is successfully executed, the status will be set
to HEALTHY. In this case, you can click on the corresponding endpoint
name in the Model Service tab to view detailed information about the
model service. From there, you can check the service endpoint in the
routing information of the model service. If the 'Open to Public' option
is enabled when the service is created, the endpoint will be publicly
accessible without any separate token, and end users can access it.
However, if it is disabled, you can issue a token as described below to
verify that the service is running properly.
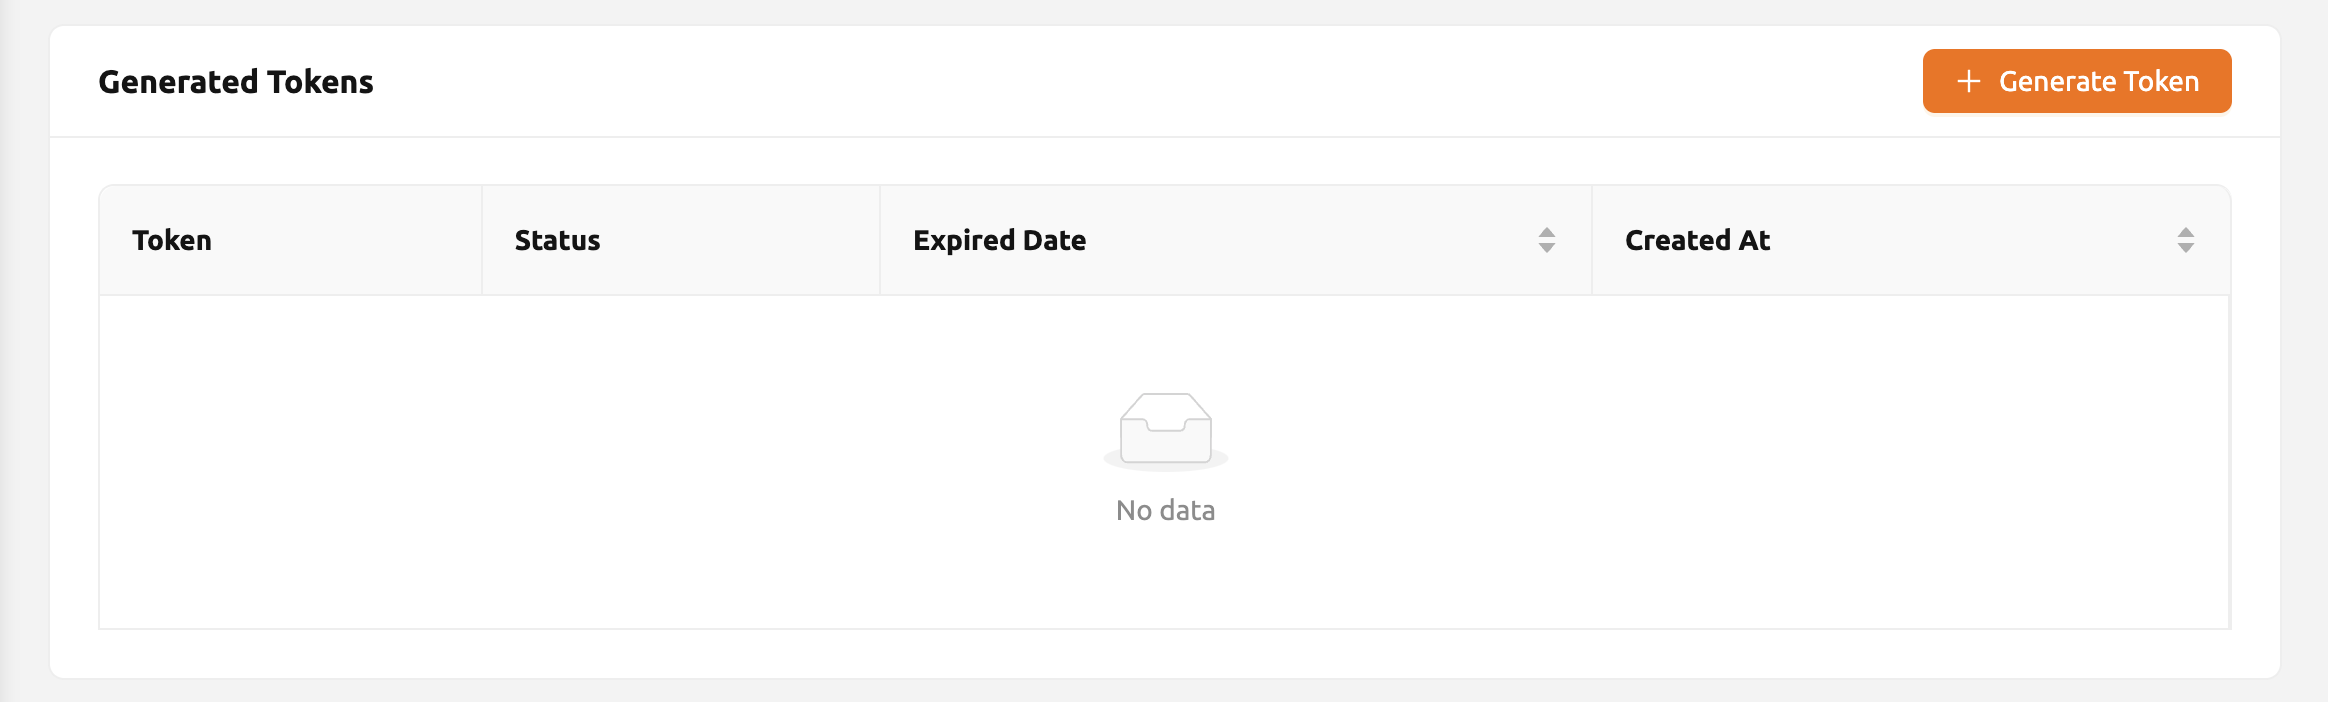
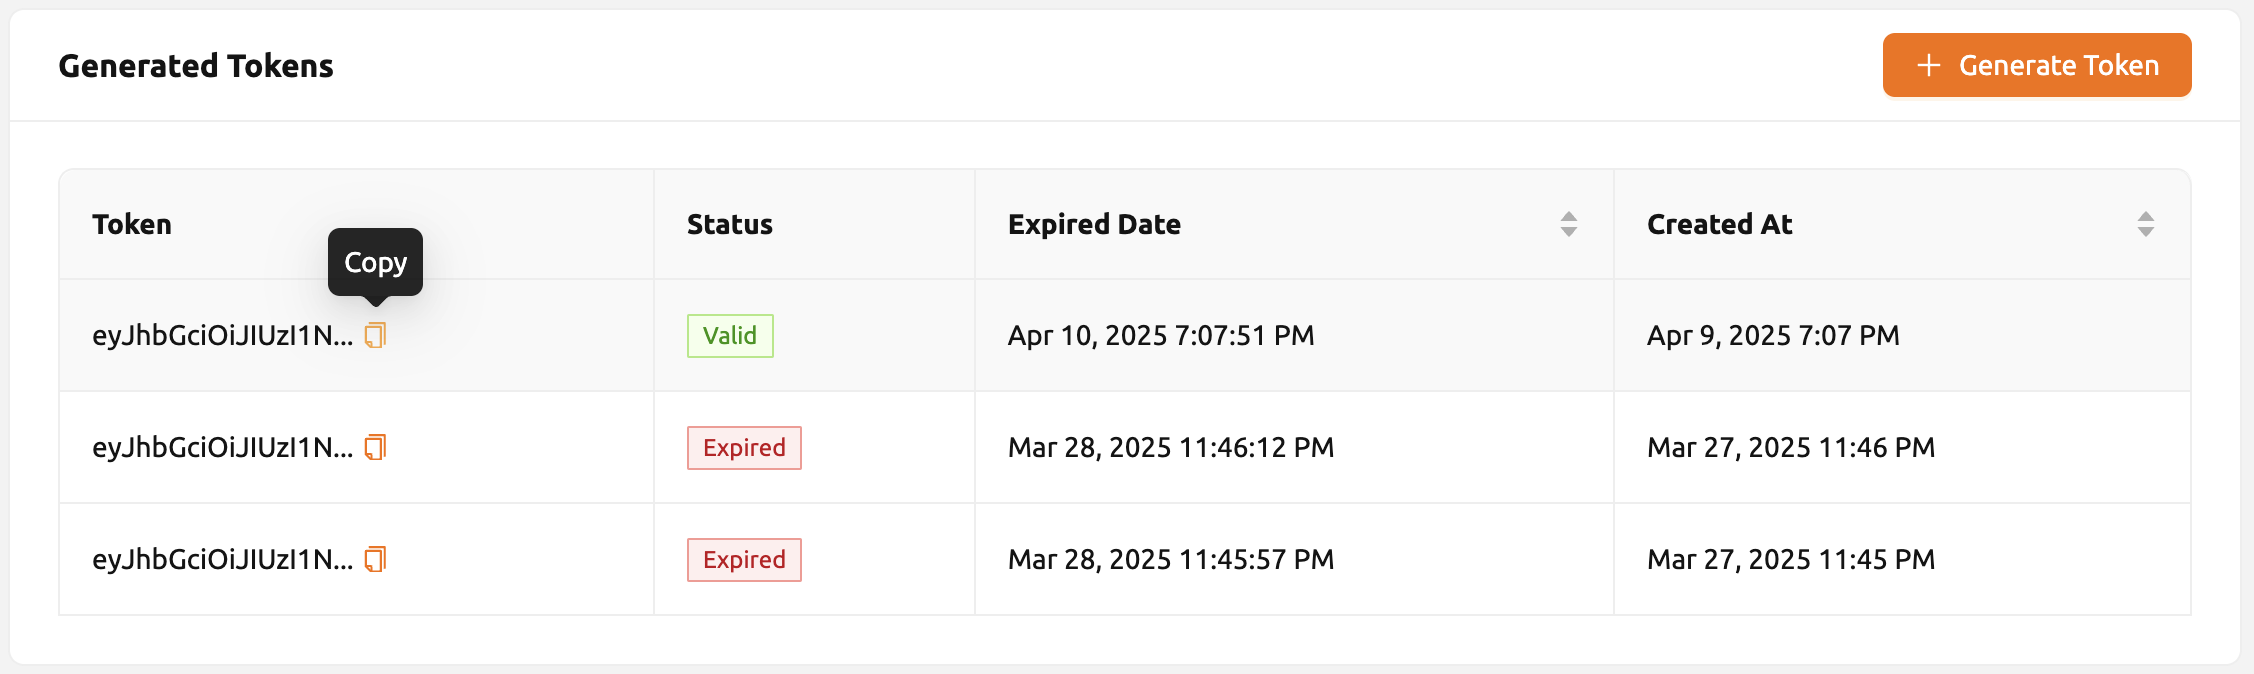
Click the 'Generate Token' button located to the right of the generated token list in the routing information. In the modal that appears for token creation, enter the expiration date.

The issued token will be added to the list of generated tokens. Click the 'copy' button in the token item to copy the token, and add it as the value of the following key.
Key |
Value |
|---|---|
Content-Type |
application/json |
Authorization |
BackendAI |
Accessing the Model Service Endpoint for End Users
To complete the model serving, you need to share information with the actual end users so that they can access the server where the model service is running. If the Open to Public option is enabled when the service is created, you can share the service endpoint value from the routing information page. If the service was created with the option disabled, you can share the service endpoint value along with the token previously generated.
Here's the simple command using curl command whether to check sending any requests
to model serving endpoint working properly or not.
$ export API_TOKEN="<token>"
$ curl -H "Content-Type: application/json" -X GET \
$ -H "Authorization: BackendAI $API_TOKEN" \
$ <model-service-endpoint>
Warning
By default, end users must be on a network that can access the endpoint. If the service was created in a closed network, only end users who have access within that closed network can access the service.
Using the Large Language Model
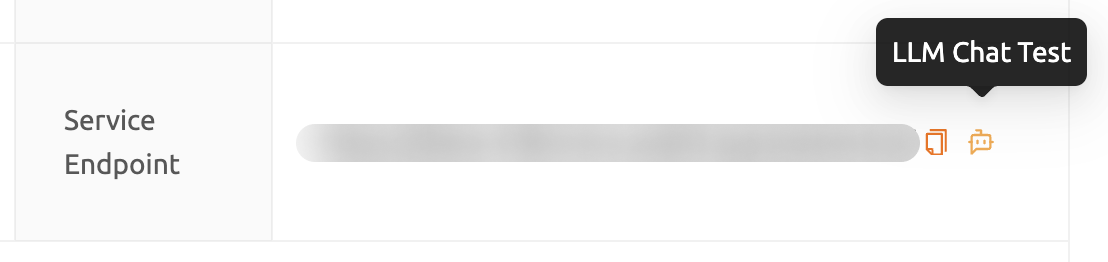
If you've created a Large Language Model (LLM) service, you can test the LLM in real-time. Simply click the 'LLM Chat Test' button located in the Service Endpoint column.
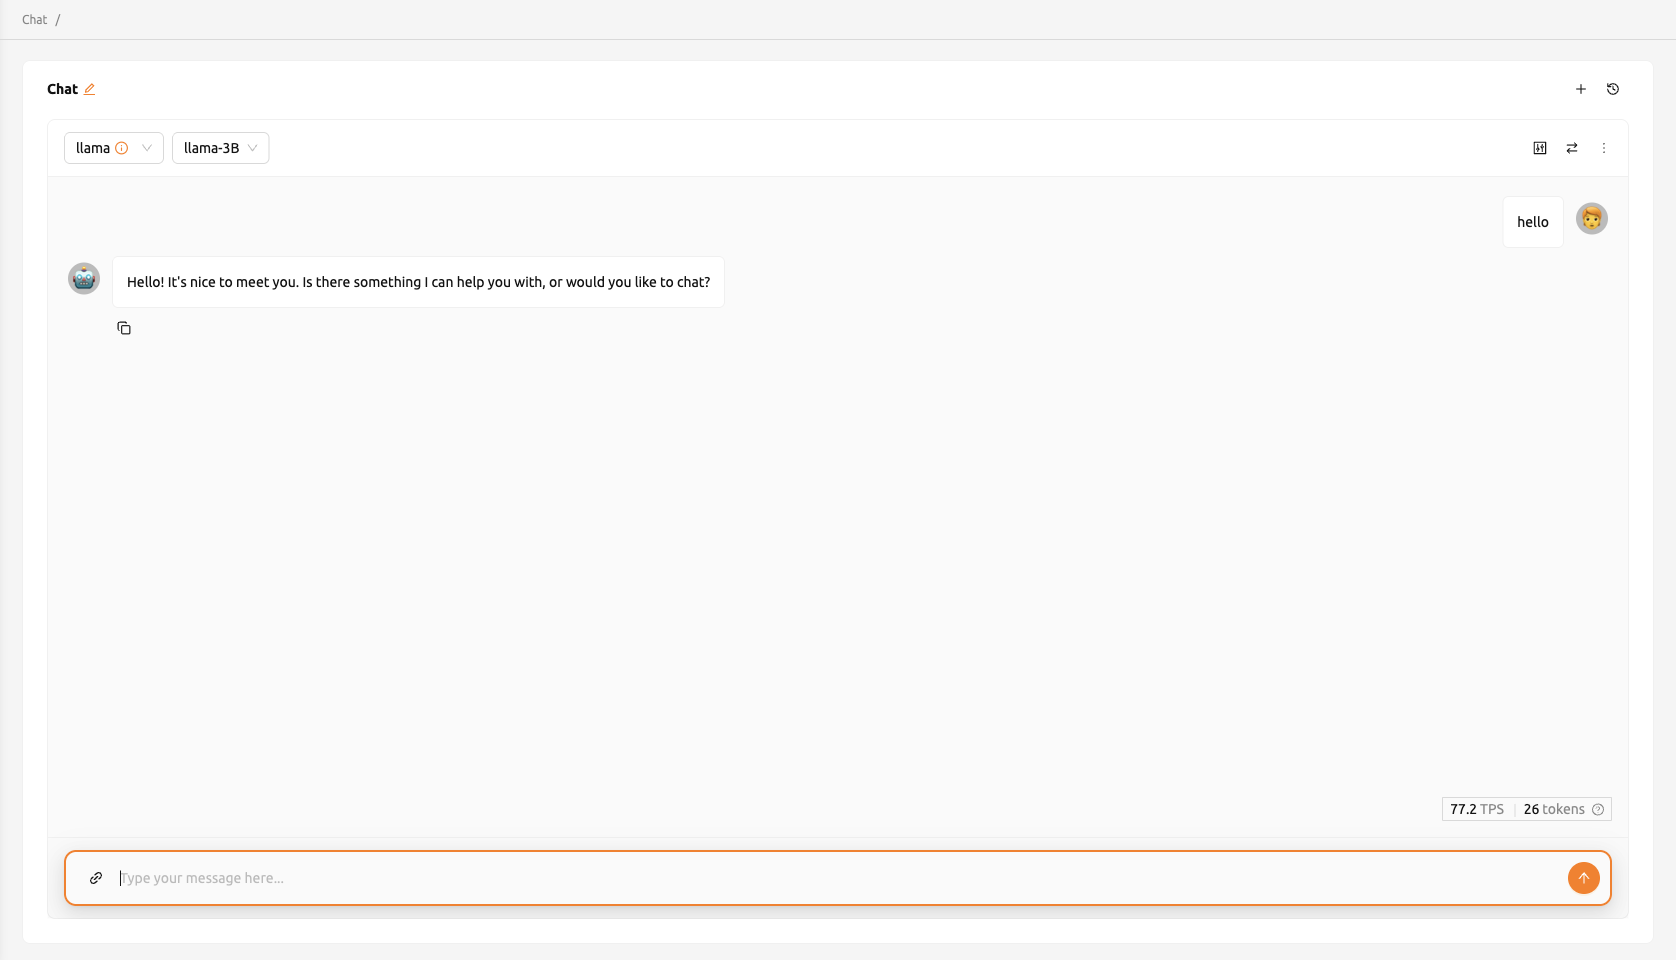
Then, You will be redirected to the Chat page, where the model you created is automatically selected. Using the chat interface provided on the Chat page, you can test the LLM model. For more information about the chat feature, please refer to the Chat page
If you encounter issues connecting to the API, the Chat page will display options that allow you to manually configure the model settings. To use the model, you will need the following information:
baseURL (optional): Base URL of the server where the model is located. Make sure to include the version information. For instance, when utilizing the OpenAI API, you should enter https://api.openai.com/v1.
Token (optional): An authentication key to access the model service. Tokens can be generated from various services, not just Backend.AI. The format and generation process may vary depending on the service. Always refer to the specific service's guide for details. For instance, when using the service generated by Backend.AI, please refer to the Generating Tokens section for instructions on how to generate tokens.

Modifying Model Service
Click on the wrench icon in the Control tab to modify a model service you want to update. The format is identical to the model service start modal, with previously entered fields already filled in. You can optionally modify only the fields you wish to change. After modifying the fields, click the 'confirm' button. The changes will be adjusted accordingly.
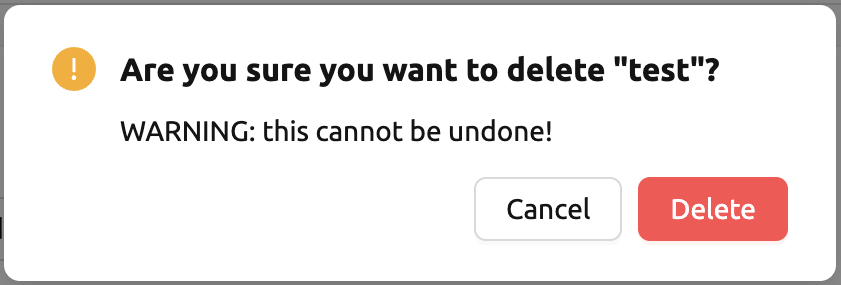
Terminating Model Service
The model service periodically runs a scheduler to adjust the routing
count to match the desired session count. However, this puts a burden on
the Backend.AI scheduler. Therefore, it is recommended to terminate the
model service if it is no longer needed. To terminate the model service,
click on the 'trash' button in the Control column. A modal will appear asking
for confirmation to terminate the model service. Clicking Delete
will terminate the model service. The terminated model service will be
removed from the list of model services.